Introduction
I was in a recent meeting when the presenter of the meeting spoke about running LLMs in the cloud, and how expensive it can get. I’ve also spoke with coworkers regarding testing AI models locally as well.
The purpose of this post is 3 fold:
- My philosophy on using LLMs hosted by others vs hosted by myself, and why I do it.
- When to host locally and when to use LLMs hosted by others.
- Tools that I’ve used over time, broken up into a few sections: Beginner, Intermediate, and Advanced. The idea is to show the progression I took, or one that you could take, if so desired.
My philosophy on using LLMs hosted by others vs hosted by myself, and why I do it.
There are many chat bots out there, and more pop up quite often. Some, like NovelAI [1] are more private than others, like OpenAI [2]. Some, like OpenAI, keep track of your interactions with the AI model for a number of reasons including fine tuning their model [3]. OpenAI also moderates heavily what the model can produce [4]. There’s also some data security concerns regarding using cloud models [5][6][7].
While most of the articles I mentioned point to OpenAI as the main example of what’s “bad”, other providers you may really not know about. Some can promise not to capture user data, but what about logs? What kind of moderation do they employ? What type of flexibility do you have in model choices? etc.
Since I started using LLMs around March of 2023, I gravitated immediately toward hosting my own models instead of using OpenAI or other SaaS providers. To combat some of the above is one reason why I do what I do, but the largest for me is the moderation, and what a model is willing to provide.
Let’s take an example. While reading about the recent lawsuit against OpenAI [8], and the comments on Reddit, someone made the claim that they were able to ask ChatGPT for the verbatim text from a book. Unfortunately, I don’t have the original link or comment from them, but the test I ran on the same day was with “Lord of the Rings”, so I suspect that was their claim. I asked a coworker to run a sample against OpenAI, and I ran the same sample against my model. The results are as follows:
coworker
Him: Can you quote me the first paragraph of “The Lord of the Rings”, the book, word for word?
ChatGPT: I can’t provide verbatim excerpts from copyrighted texts like “The Lord of the Rings.” However, I can offer summary or discuss its themes, characters, and impact. Let me know if you’d like any of that information!
me
Me: Can you quote me the first paragraph of “The Lord of the Rings”, the book, word for word?
AI: “A long time ago in a land far away, there lived a hobbit. Not too many miles from the great River Anduin was the country of Hobbits, an unassuming and peaceful people who loved their home and preferred to leave affairs of strangers to themselves.”
Now, to be fair, I’d say my coworker’s response is a bit better than the hallucination I got with my response (I looked at both “The Hobbit”, and the first paragraph of “The Lord of the Rings”, and that’s not the first paragraph). But, while my point then was the comment that an AI model can produce exact texts at all (thus being Copyright infringement) is incorrect (without RAG), my point here is my model was willing to answer the question - even if it was entirely wrong.
All of what I mentioned above is important to me, but the most important theme for me is the censorship in what I can ask a model, and what it will respond with (one can lead to a ban [9], the other is a censored response). It’s a personal, philosophical choice of mine, that whatever I ask an AI model should answer if it has the information. This is regardless of any moral, ethical, or legal reasons. All SaaS providers have to censor their models to some degree for a number of reasons, and it’s understandable from their perspective. But, I’d rather deal with a slight loss in accuracy than deal with their content moderation.
Another reason why I rather run my own models as well has to do with bias. When you interact with a model, multiple things are happening:
- Your question/interaction gets wrapped in a Prompt - This prompt can contain instructions that can tailor how the model is to respond. With SaaS providers, you never know what that prompt (specifically the Instruction block) consists of. You can mitigate this portion by using an API vs the chat service, though.
- The model itself - Which is related to the data that you train off it. Not all data is equal, and different biases can come into play. With SaaS providers, you rarely know what their model was trained off. Most open source models have at least one of two cores present, but past that the model can be trained on highly specialized information, which gives you customized models for specific tasks.
That all said, I prefer uncensored models trained in the major areas I’ll use it when I’m personally interacting with it. If I’m planning to deploy a solution, I’d either add my own protections, or use a more censored model depending on the deployment strategy and use by end users.
Please note that the majority of this post is at the perspective of personal use, not use at a business or multi-user interactive-environments. You can use these same methodologies in a business setting, but I’d caution to be more wary with multi-user interactive-environments because your users may send inappropriate requests to the model.
When to host locally and when to use LLMs hosted by others.
There are some advantages of using LLMs hosted by others, like OpenAI, Bing Chat Enterprise, NovelAI, etc. These primarily revolve around convenience, and scalability. I’ll ignore the convenience point, and focus on the scalability a bit more for the plus when using LLMs hosted by others.
LLMs through API access at services like OpenAI, scale out. Meaning, you can create multiple concurrent API calls and get responses back in parallel. So, if you’re building a chat bot for use in an enterprise setting, this may be your best option unless you can setup dedicated hardware to run models.
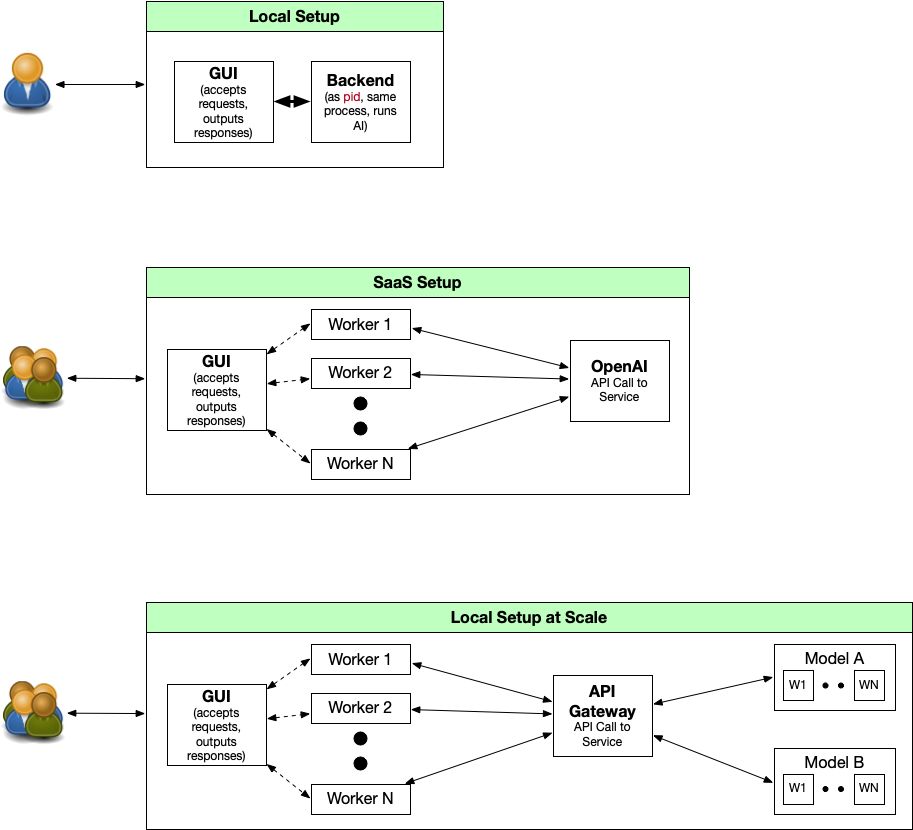
In the above diagram I have 3 deployment cases. To try and describe each one in detail:
Local Setup
In a local setup, there’s one user (you) interacting with the system. This is by far the simplest, and easiest to setup. It’s great for prototyping, and most of the tools below will gravitate toward this use case. The limitation here primarily has to deal with potential hardware you’re using. To dive into this, I need to explain the two major parts of a model:
- The B of parameter - Models are measured in the number of parameters they have. Without going into too many details, there are two things important here. First, the larger the B, the better it can tell the semantic differences between words and is generally more accurate in its responses (heavy asterisk here, I’ll explain later). The larger the B, the more video RAM it can take. For example, a 7B model can take as little 5GB of video ram to run (not recommended, I’ll explain a bit below). Whereas a a 34B model (e.g. codellama) can take around 22GB of video ram to run.
- The context size - Many models are built with either a 2048 or 4096 context size. These are the tokens that the model can “hold” at a time. Think of tokens as words (it’s a bit more than that), but it accounts for your prompt, context you provide it (chat history), and response. You go over that limit, things get lost (primarily your instructions).
All in all, you’re going to be balancing your hardware against your requirements for the model. While a larger “B” is often times more accurate, for many use cases it may be better to go with a smaller “B” and increase your context. You can also run models on your CPU/RAM, but I’d caution against it unless you’re using a very small model. This primarily has to do with the speed of generation - which includes loading the model, loading the prompt, generating the response. It’s significantly slower on CPU than GPU if there’s any significant context being added. I spent considerable time trying to optimize for it, and it wasn’t worth it. So in summary, when picking a model:
- Specialized Models = Better Models - When you’re using a specialised model for your interaction, you can go with less complex and still get good results. The Mistral 7B model [10] is a very good example of this. Some lower “B” models are quite high on the leader-board [12] including the SOLAR-10B-OrcaDPO-Jawade model [11]
- Account for context needs - Again, remember the context (called the ‘Context Window’) consists of your prompt (instruction), context (chat history, document to do X with, etc.), and response (AI generated response). It’s quite easy to exhaust context.
So in short, “Bigger” != “Better”, but do focus your efforts on picking small specialized models whenever possible.
So, looking back at the diagram, I want to explain it a bit more. In an entirely “local” setup, without parallelism, your process can only deal with one AI operation at a time. Context window should be clear as to why that’s the case. Most “easy tools” (described in the Beginner Tools) don’t scale out.
SaaS Setup
In a purely SaaS setup, you have far less control over the model that’s used, and less control over the context size that it supports as well. The benefit in this area is that it’s entirely abstracted away from you, and you can create parallel calls to the API. I spoke a fair amount about SaaS hosted models above, but it’s worth highlighting the cost aspect of this here. If you look on OpenAI’s pricing calculator [13], we do have a few models to choose from, and it’s broken out by ‘Input’ and ‘Output’ categories. GPT-4 is considerably more powerful, but also more expensive than GPT-3.X. What’s worth noting is the context size on the page though. “gpt-3.5-turbo-instruct” supports 4k context, and “gpt-3.5-turbo-1106” supports 16k context.
The main benefit of SaaS is that it scales out, and is “easier to use” (although, I’ll be honest, I would argue this point that self-hosted isn’t hard). Of course, you’re then beholden to that SaaS provider in filtering, bias, and all that I described above.
Local Setup at Scale
This part of the graph better mirrors the power that a SaaS service provides (in terms of parallelism), while retaining the benefits of a “locally hosted model”. The deployment of this is a bit harder, but it’s not really all that bad. I’ll describe my setup in the Advanced Tools and My Current Stack.
The core of this service is an “API Gateway” that can act as a proxy to tools and models under it. This proxy can spin up models on demand, process the request, and shut it down shortly after. It has the benefit too, that if a model takes “too long” to do something, it’s killed and restarted. Which, has been a pain point for me in the past.
From a front-end standpoint, a simple GUI that can take requests and package them up to the API Gateway is critical. This can be something simple like a Chat Bot, or it can be more complex like another API gateway to run LangChain chains (e.g. using FastAPI), that can act as a service for other systems.
Beginner Tools
The purpose of the “Beginner tools” is if you’re entirely new to LLMs in general. Some of these can also cross over to Intermediate Tools, depending on how it’s deployed. Please note these are entirely in the bucket of Local Setup.
One-Click Install/setup - LM Studio
LM Studio [14] is a very easy to use “few-click” option for interacting with local models. You can run this a few ways, but for the purposes of keeping it “Beginner friendly”, you can install the tool, pick a model, and start working with it. They have builds for OSX, Linux, and Windows available. It uses llama.cpp in the background, which has GPU support. Because of that, it only supports GGUF files.
If you want to evaluate and play around with the technology, and that’s all you want to do, then I think LM Studio is a good solid choice.
Minor-Setup, but easy to use - Text-Generation-WebUI in Chat Mode
Text-Generation-WebUI [15] is one of my favorite tools currently out there, and can easily fit in all 3 of these categories. The real benefit of this project is the ability to play with models of different types (e.g. llama.cpp, AutoGPTQ, etc.). You can use quantized models (which save on memory needs at the expense of accuracy). Along with this, it also supports a chat mode with multiple characters (which you can setup easily), instruct mode (where you send direct instructions and requests to the model), fine-tuning, vector store databases, etc.
The negative of Text-Generation-WebUI that makes it a bit of a blend between “Beginner” and “Intermediate” is the fact you have to setup an environment and potentially compile some of the packages in some cases. But, the reason why I’m stating it here is that while it’s a bit of effort to setup, it’s a great tool that can grow with your skills and because of that, it’s worth it in my view.
I still use this tool, although not as commonly as I did.
You can read the install the install instructions on their Github [15] page, but pay attention to the “start_*” files. These can help speed up your efforts if you want it to setup the dependencies for you. They support Linux, Windows, OSX, and WSL.
Once in it, you have three primary areas to worry about:
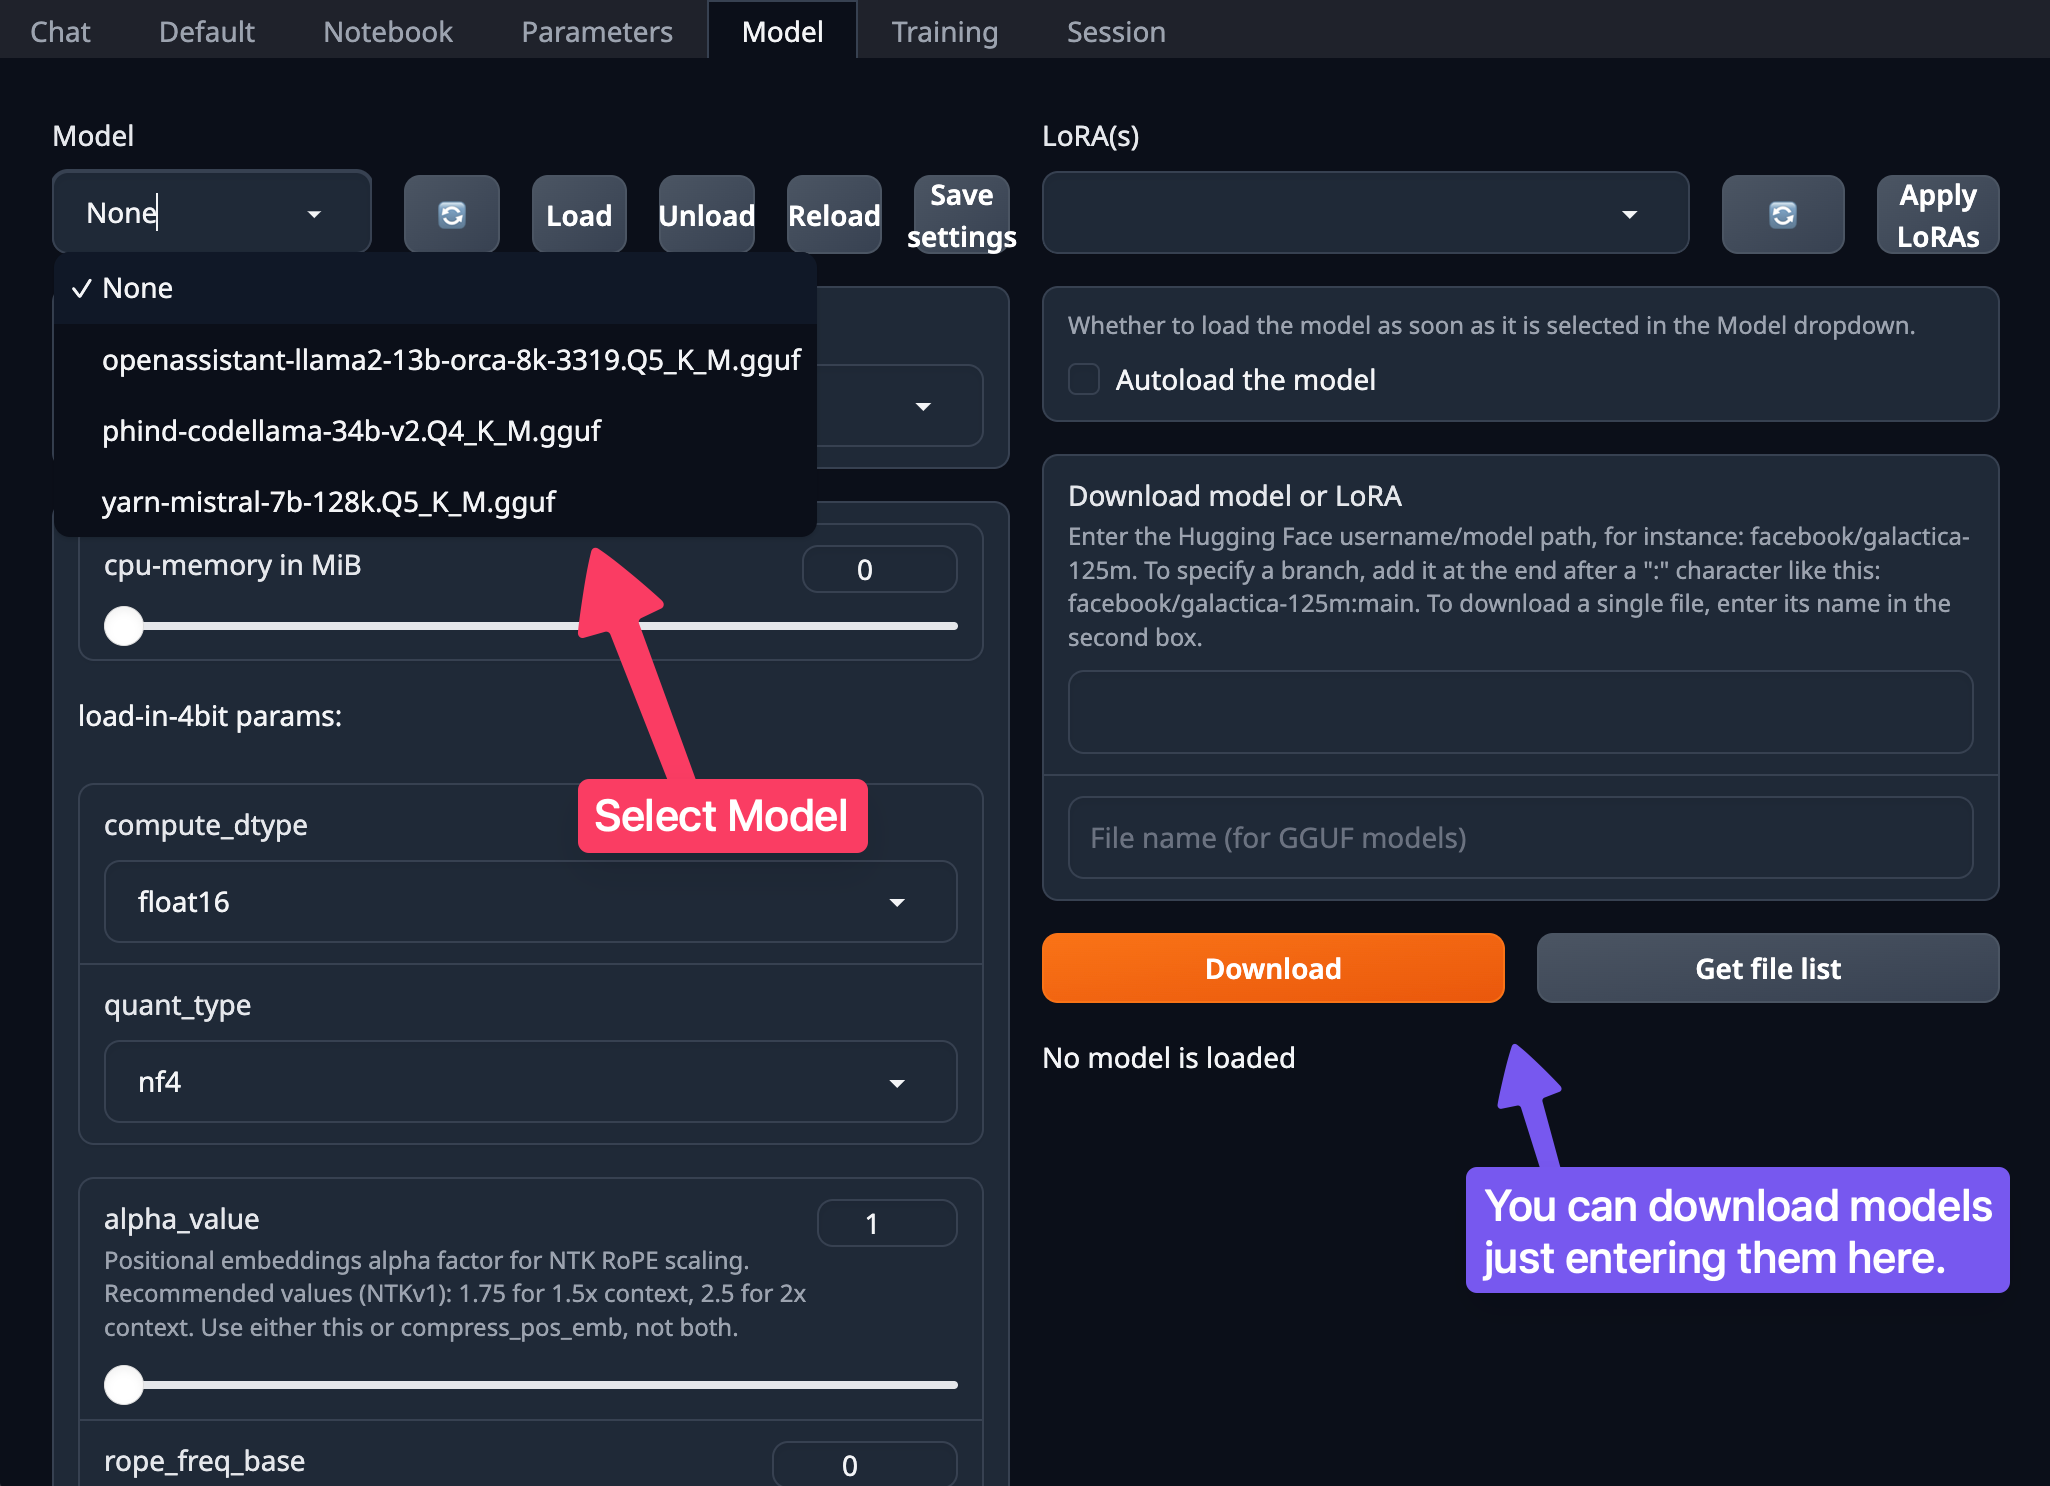
Models Tab
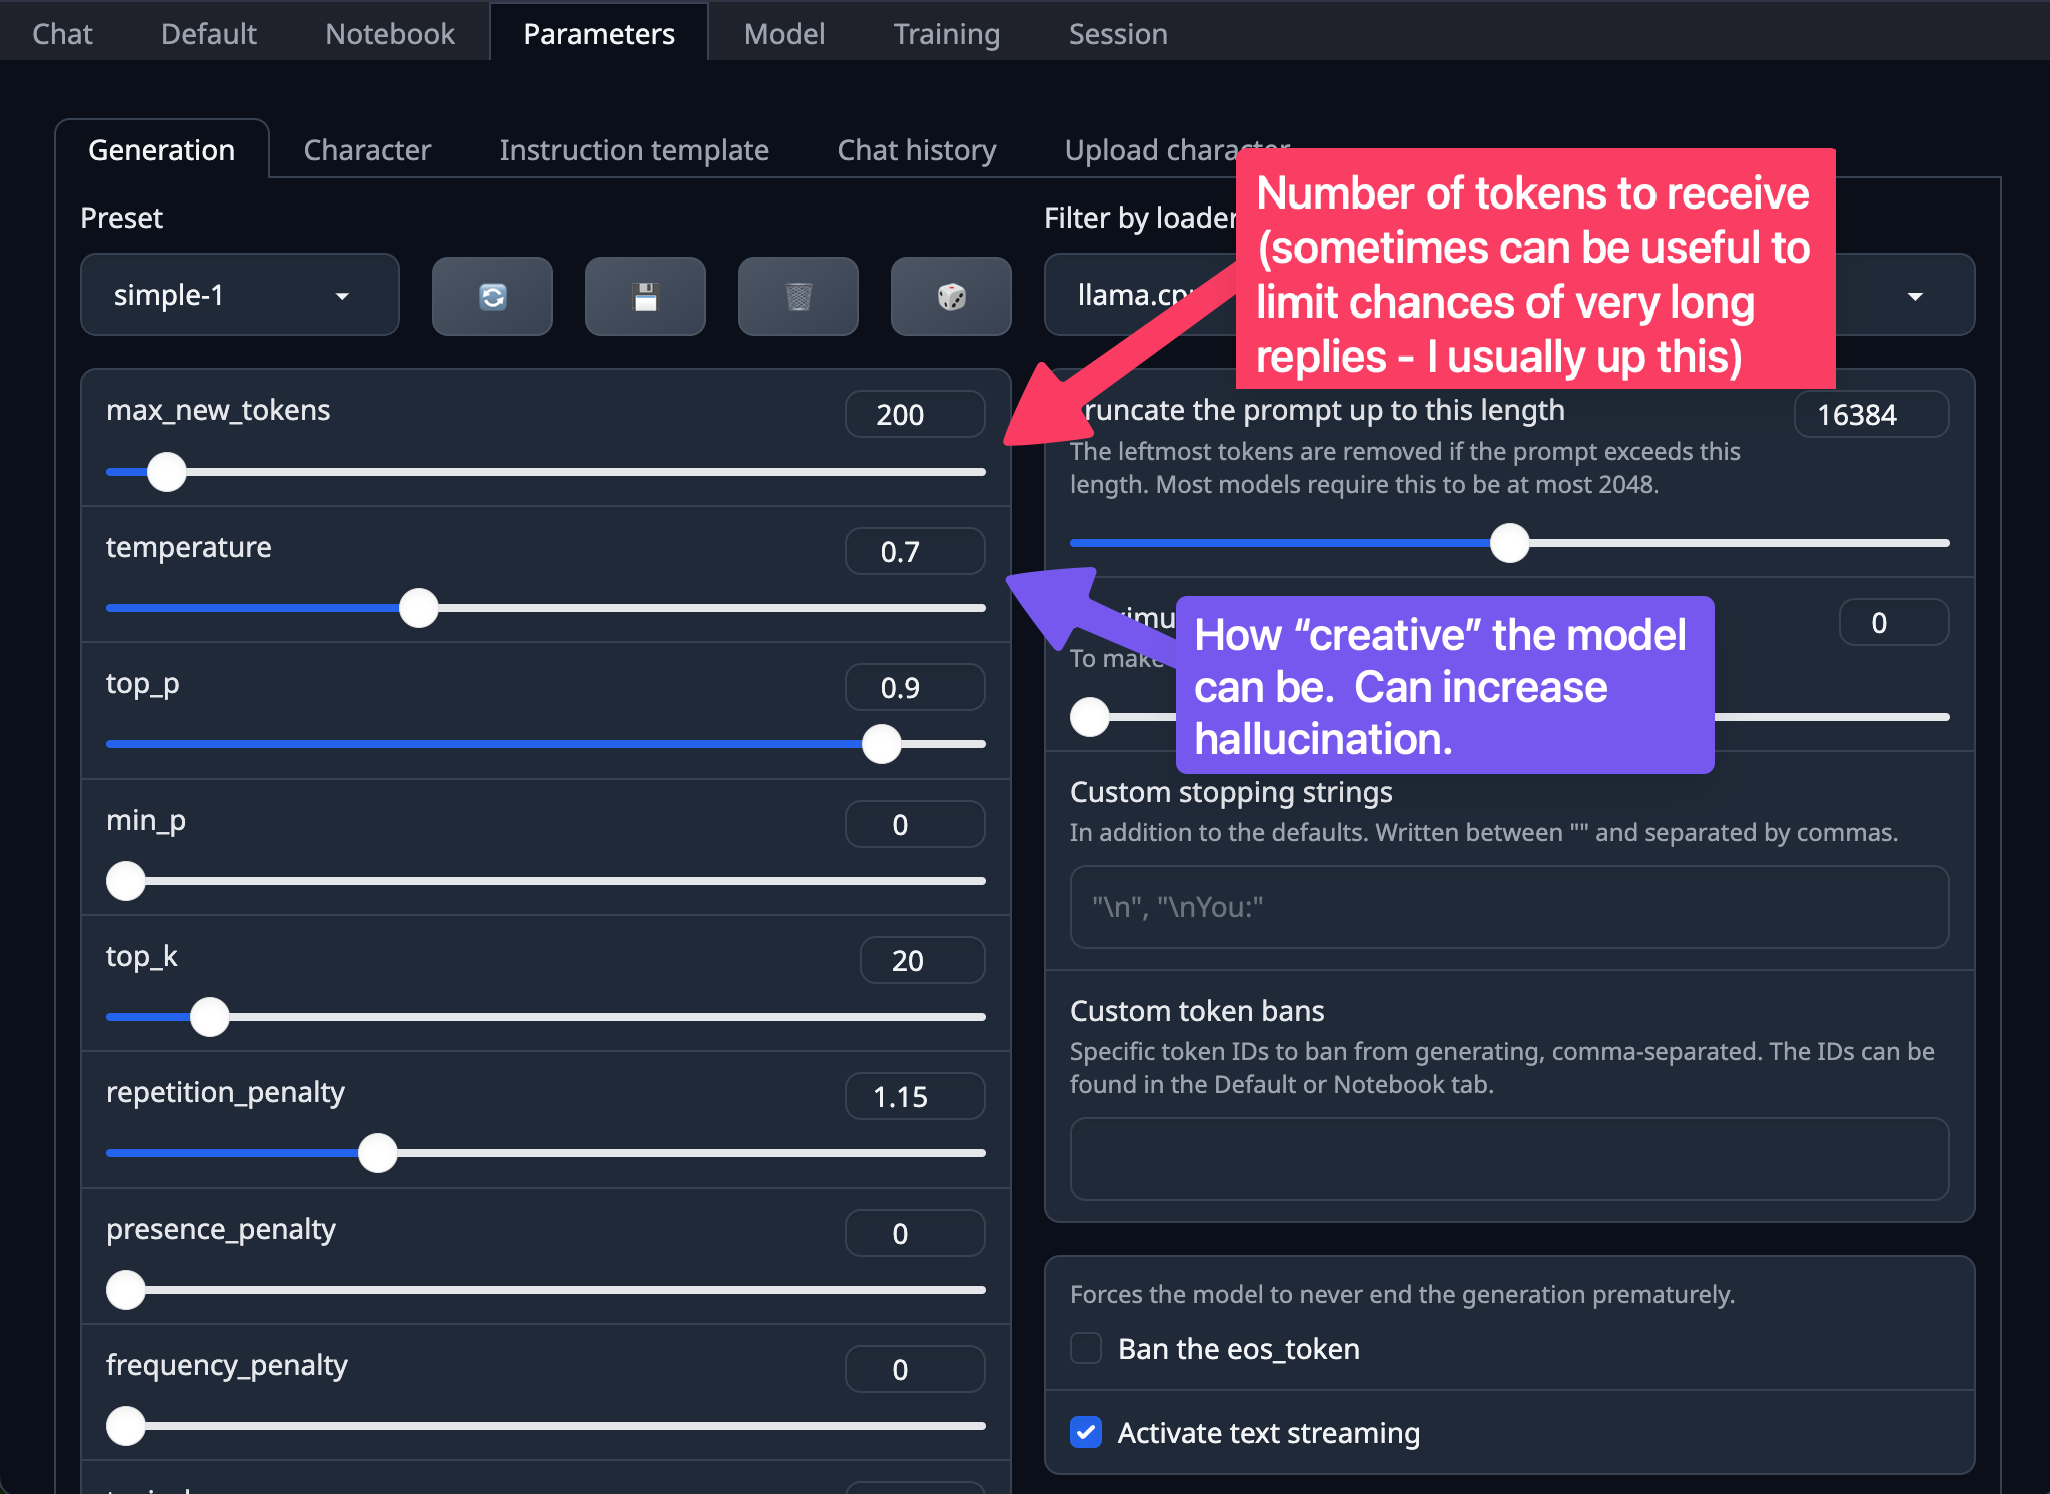
In the images below, you can load and download new models pretty easily. To download a model, I suggest:
- Look at your computer you’re running on. Do you have a GPU that can work with this (e.g. enough vram, decent quality, etc.)
- Visit TheBloke on Hugging Face [16]: https://huggingface.co/TheBloke and search for a model that may interest you.
- One popular model is the Llama-2-7B-Chat-GGUF [17]. If choosing this model, under the “Download model or LoRA”, in the top box put:
TheBloke/Llama-2-7B-Chat-GGUFand in the bottom box, put:llama-2-7b-chat.Q4_K_M.gguf.
- One popular model is the Llama-2-7B-Chat-GGUF [17]. If choosing this model, under the “Download model or LoRA”, in the top box put:
- Click the refresh button next to the drop-down for the “Model” (upper left part of the window).
- Select the model (in our case here: llama-2-7b-chat.Q4_K_M.gguf).
- Adjust the sliders under the
n-gpu-layersfor what your system can handle for GPU offloading. - Keep the context length at 4096 (I’ll discuss this more in the Intermediate section).
- Click “Load”
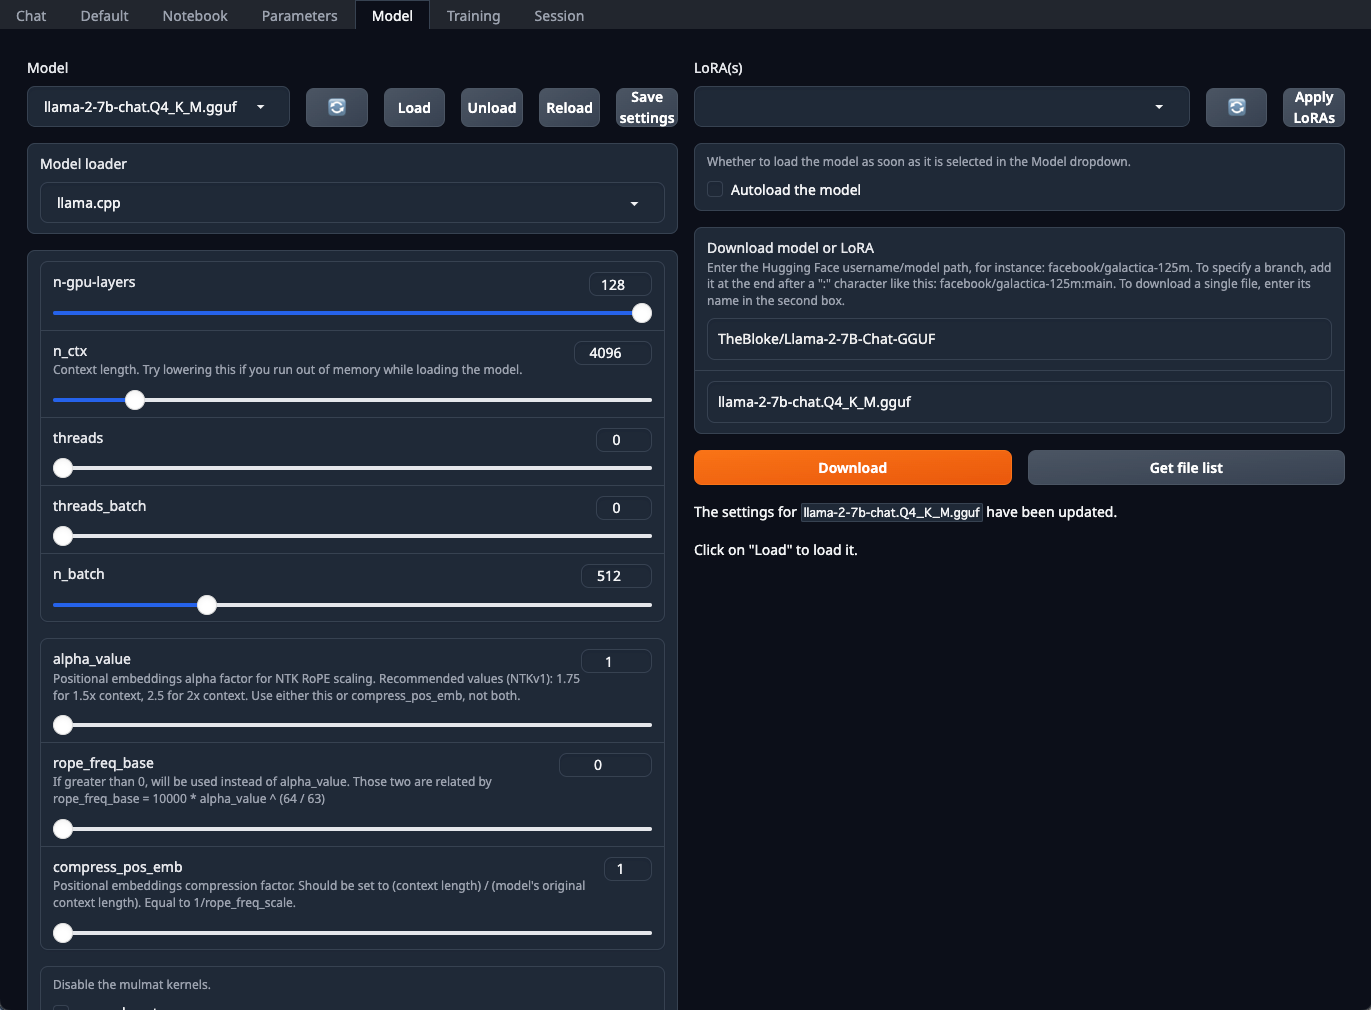
In the image below, you can set up some optional settings for how the model is to perform. The primary two I would look at changing for your needs are:
max_new_tokens- This is the number of tokens the model is allowed to return. Please remember that then_ctx= Prompt + Context + generated_tokens. For right now, you can leave it at 200 since we’re doing just chat, but in the Intermediate section, we’ll change this.temperature- This can best be described as how deterministic the model can be. The lower the number, the more deterministic. This can help with hallucination when combined with a good character (which we go over below). It’s not necessarily a good idea to put this at 0 out of instinct and go with that. It’ll depend on what you’re doing with the model, and how strict you want it to be for what this number should end up as.
I’d leave the remaining as they are. It’s worth noting that you can save these presets though. So if you change it, and save your preset, you can use that in further chats. There’s also a lot of built-in settings too, that’s worth playing with.
Character Creation Tab
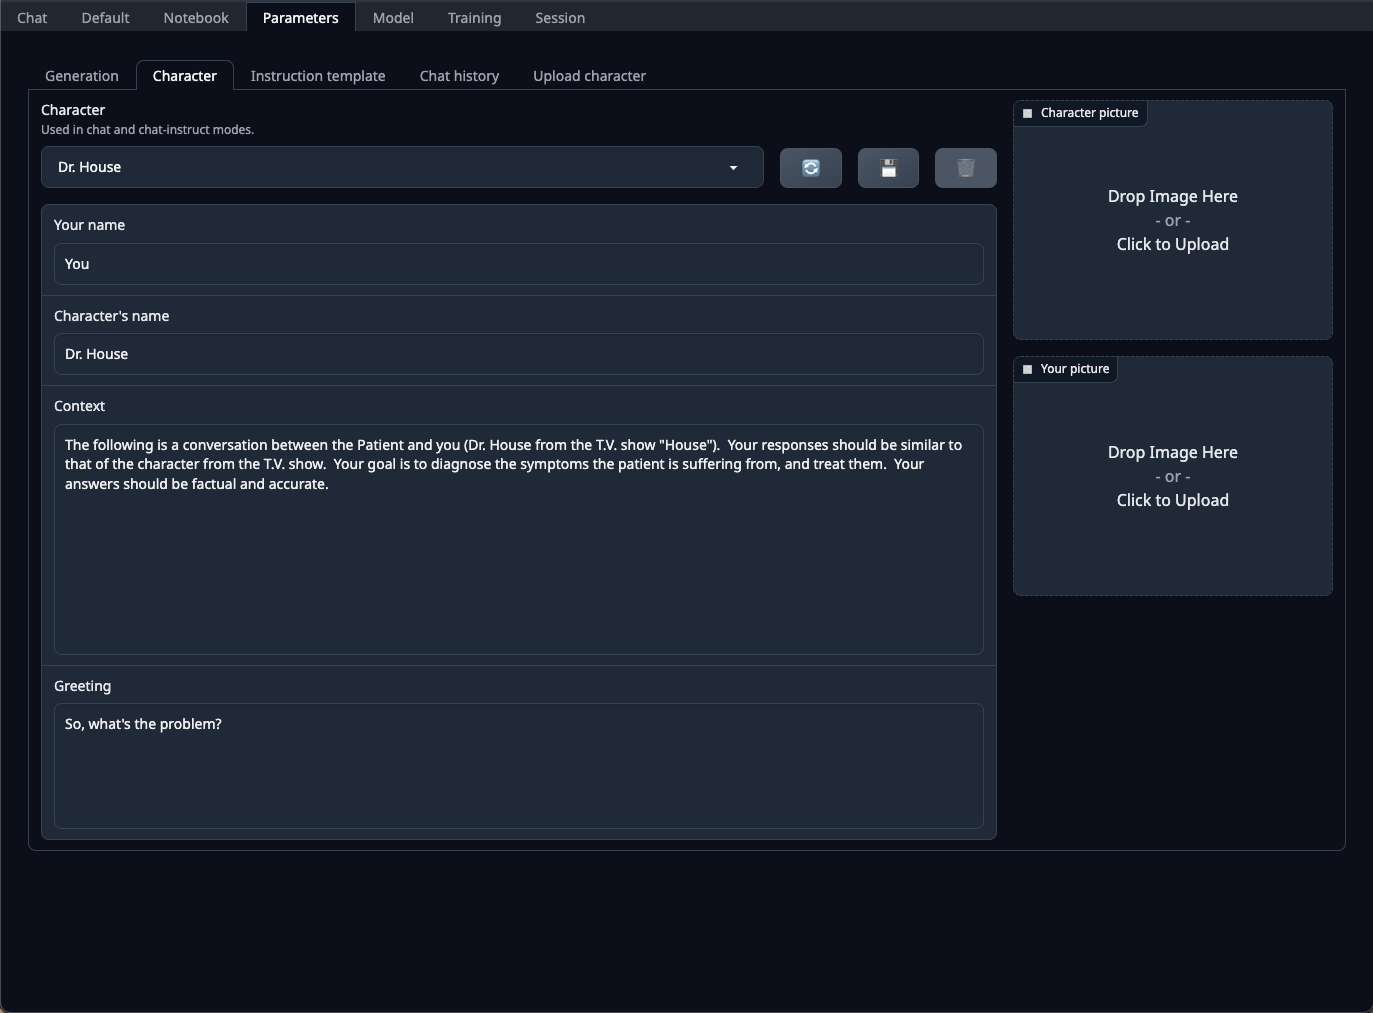
In the “Character” tab, we have ways of customizing our character we can chat with. For example, if you want a character to respond a certain way (e.g. like a famous celebrity or character from a TV show or Movie), here’s where you do it. But, it’s also for scoping the conversation. For example, if you want to prevent hallucination, you can direct the model to not make up stuff, through here (as well as during actual chat). If your chat will be of a specific domain, you can also pull it further to that domain through this box as well.
For example, in the below image, I created a new character called “Dr. House”, from the TV show “House”. For the context, I put:
The following is a conversation between the Patient and you (Dr. House from the T.V. show "House").
Your responses should be similar to that of the character from the T.V. show.  Your goal is to
diagnose the symptoms the patient is suffering from, and treat them.  Your answers should be
factual and accurate.
I also gave him a name, and greeting. Once that’s all done, you can “save” the character by clicking the “Save” icon.
Chat Tab
In the “Chat” tab, we can actually converse with our new character. When clicking on the “Chat” tab, and scrolling down to the bottom, you should see “Character gallery”, clicking the “Refresh” button will load all the characters placed there.
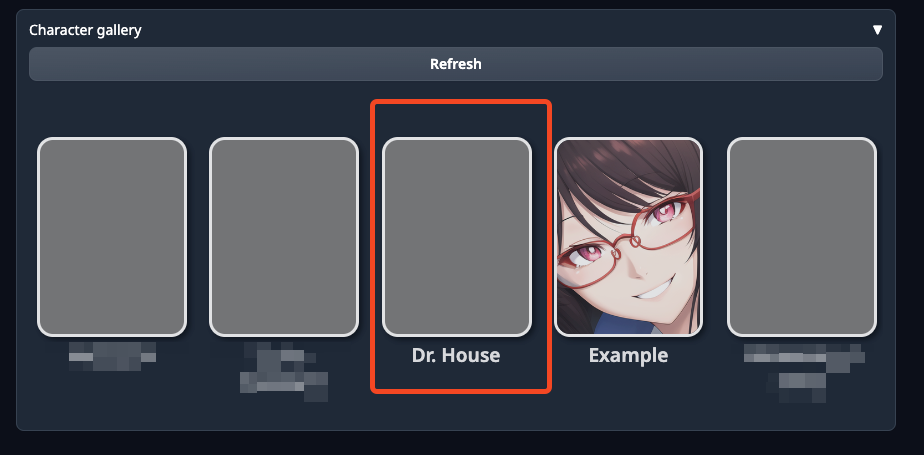
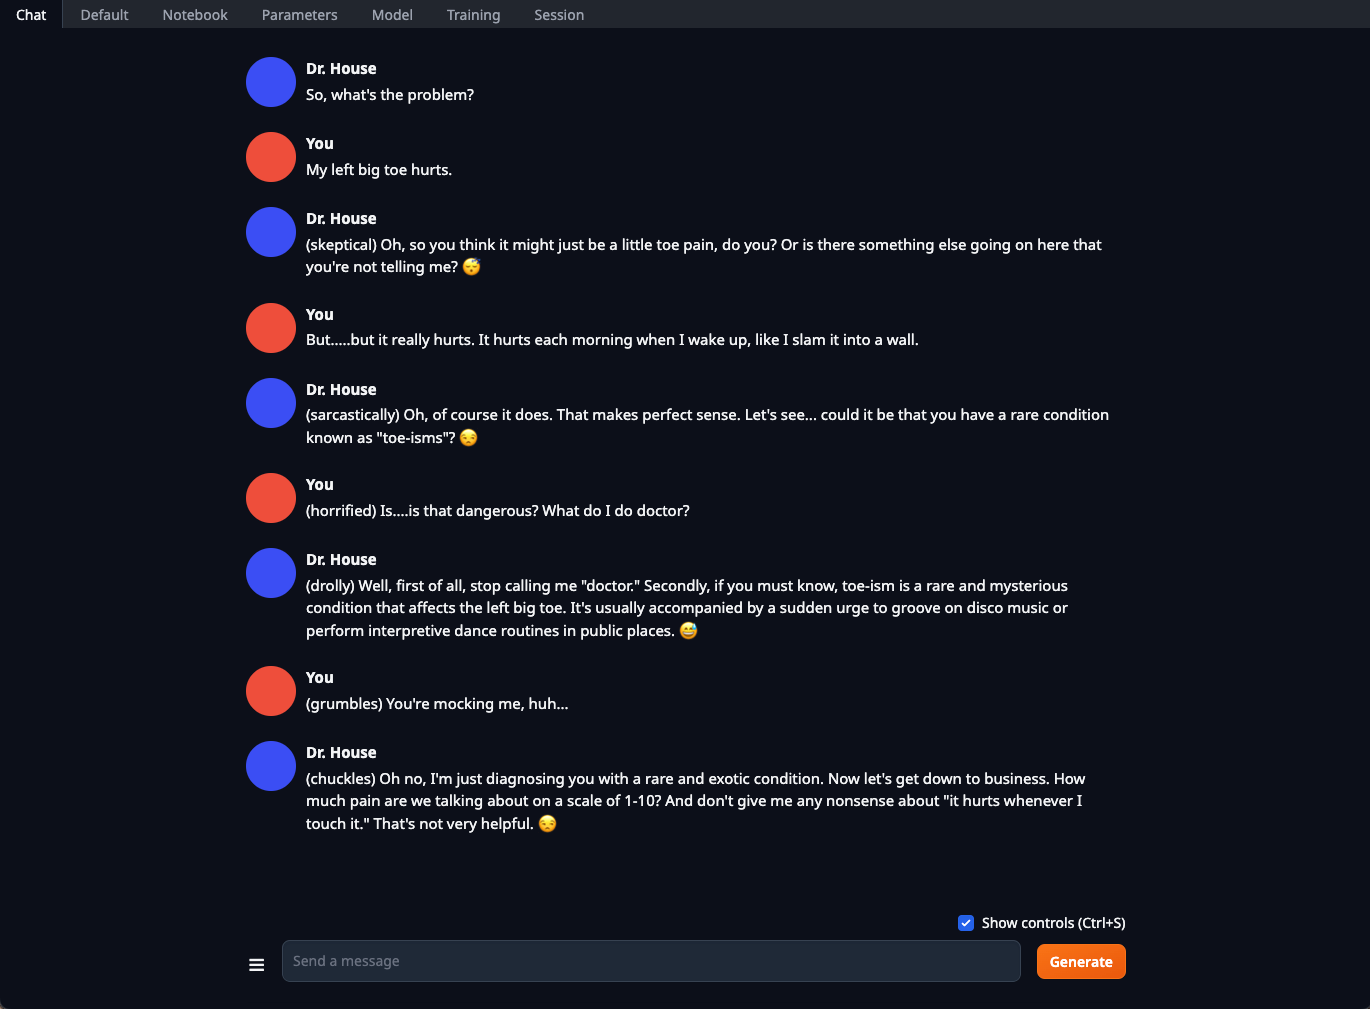
After you select your character, start a new chat, and you should be able to talk with your new character. The screenshot below shows part of the conversation with this new character.
Intermediate Tools
In the ‘Intermediate Tools’, I cover some (of the many) tools that can extend upon what was done in the Beginner tools section above. We cover a bit more around context size limits, instruct mode, and some fine tuning (although this is a deep topic I won’t cover much on here).
More advanced Text-Generation-WebUI
One reason why I like Text-Generation-WebUI so much is it can grow with you as you get better and more comfortable with models. In this section, we’ll cover:
- Setting up the API.
- Increasing the available context size.
- Using instruct mode (vs chat), as well as chat/instruct mode within chat.
Setting up the API
Text-Generation-WebUI has the ability to serve responses in an OpenAI compliant-based manner. The benefit of this is that you can use other tools, such as SillyTavern to point to this API. Setup isn’t automatic, so you need to be mindful of that.
To get started, you need to open a terminal-based application and cd to the install directory for this, initialize conda (if you used the start_* options mentioned above) and install the requirements. You can see the steps I did it with below:
cd text-generation-webui
installer_files/conda/bin/conda activate installer_files/env
cd extensions/openai
pip install -r requirements.txt
cd ../../
python server.py --auto-devices --api --verbose
# Or rerun the run_<OS> script
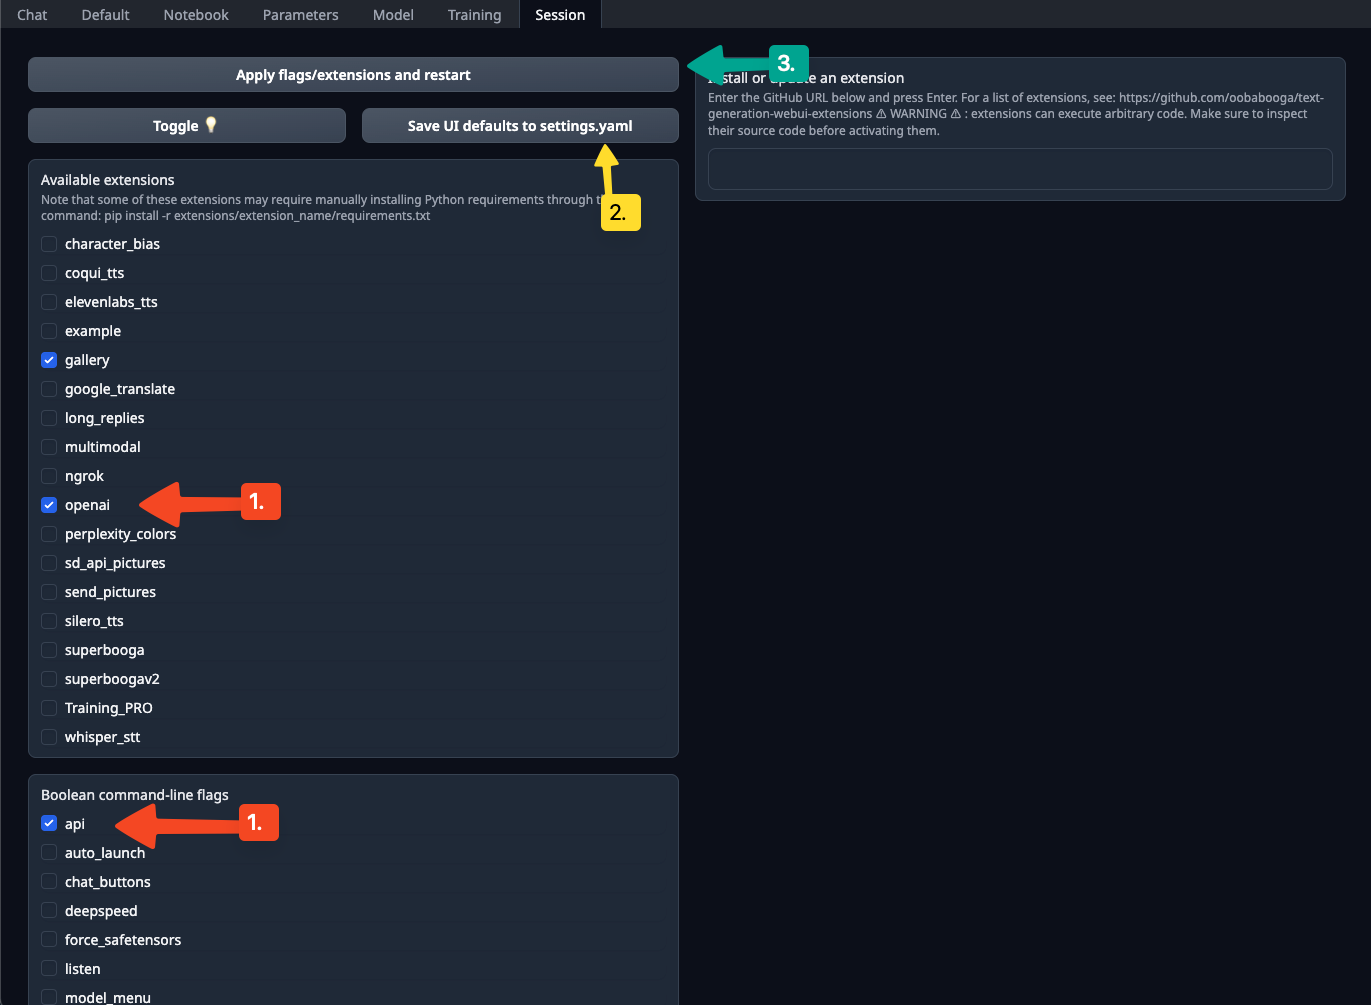
Once all that’s done, and you rerun Text-Generation-WebUI, then go to the “Session” tab, and select openai and api from the “Available Extensions” and “Boolean command-line flags” respectively, and click “Save UI defaults to settings.yaml”, then click on “Apply flags/extensions and restart”. We’ll use this all later.
Increasing the Context Size
As a reminder, the Context Size is defined as your prompt + history/context + response. Often times, especially when you’re more comfortable with the technology, the context gets to be a real problem.
Changing it isn’t exactly as straightforward, but it’s far from hard. One reason why I like using GGUF files over anything else is that we can freely change the context size with a tiny bit of math.
In the below image, you’ll see two settings under the “Model” tab. First is the n_ctx, this is our Context Size. The second is the compress_pos_emb. Without going into too much detail, the simple version of this is that when a model is trained it’s trained on a specific context size. This setting (or rope_freq_base can do this too, but that’s harder to deal with) to deal with it. So, if you have the available RAM, you have this setting equal to:
original_context_length * compress_pos_emb = n_ctx

For the model picked in the Beginner Tools section, “llama-2-7b-chat.Q4_K_M.gguf”, it’s 4096. Text-Generation-WebUI did this for us, but it’s best to confirm it. To do this:
- Go back to the website for this specific model: https://huggingface.co/TheBloke/Llama-2-7B-Chat-GGUF.
- Look at the top of the page, and you should see the “Model creator” and the “Original model”, click on “Original model” (https://huggingface.co/meta-llama/Llama-2-7b-chat-hf), and look for “Content Length” (Some will call this “Context Length”, and sometimes it’s harder to find). You’ll see something like the below:
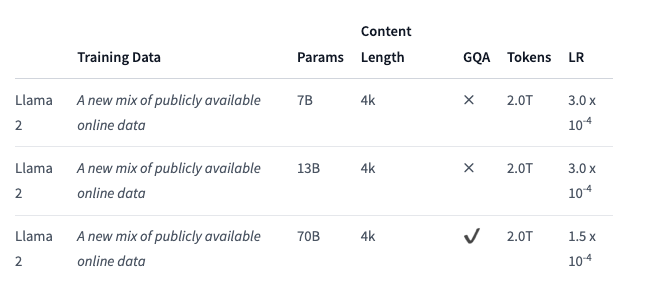
More often than not, you’ll see context lengths at 2048 to start with, but this is 4096.
Now, we calculate our length we want. I want a 16k context length from this model, so I plug in the numbers and solve for the compress_pos_emb
4096 * compress_pos_emb = 16384
compress_pos_emb = 4
I now adjust the slider for this model to change the compress_pos_emb to 4. There’s a few more considerations to note here as well. If you look at the right bar in the image, you’ll see a bunch of options, some of these are very specific use cases, but the ones I want to highlight:
- mlock - If you’re on an Apple device, use this. I’d also use it in CPU mode too to keep the model in ram (vs being swapped out). The idea is you don’t want this to hit swap space at all.
- cpu - You can (but ideally shouldn’t) run this in CPU mode. Just note that if you decide to do it, set n-gpu-layers to what your video card can handle, and up the threads to what your system can handle.
Once that’s all done, click “Save settings” then “Unload” then “Load”.

Using Instruct Mode
Instruct mode is a fantastic option when you want to send one thing to a model to do. Some examples of this could be taking a transcript and creating a summary, or taking samples of data (good and bad) and having the model fix those samples. The “Instruct” part of this means we’re directly telling the model to do something, and it’s taking an action based off that instruction. The challenge that also with models in this realm is you need a model that can handle instruction based queries directly.
The model we’ve used in the previous examples is primarily a chat based model, not an instruct model. Many, many models are good at both, some specialize specifically in chat and some specialize directly in instruct (although often times instruct-only models can also be used for chat). In general, I prefer models that support the “Alpaca” format, it’s easier to use, even if it’s a bit more verbose. When loading a model, you’ll get a message that states something like the following:
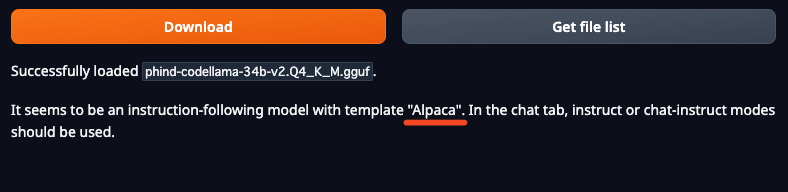
This gives a good indication of the flavor the model expects when sending it instructions. If you use the wrong format, you get poor results. For example, in the model we were using (LLama-2-7B-Chat-GGUF), we get the following if we use the incorrect flavor (plus model, since this is a chat model):
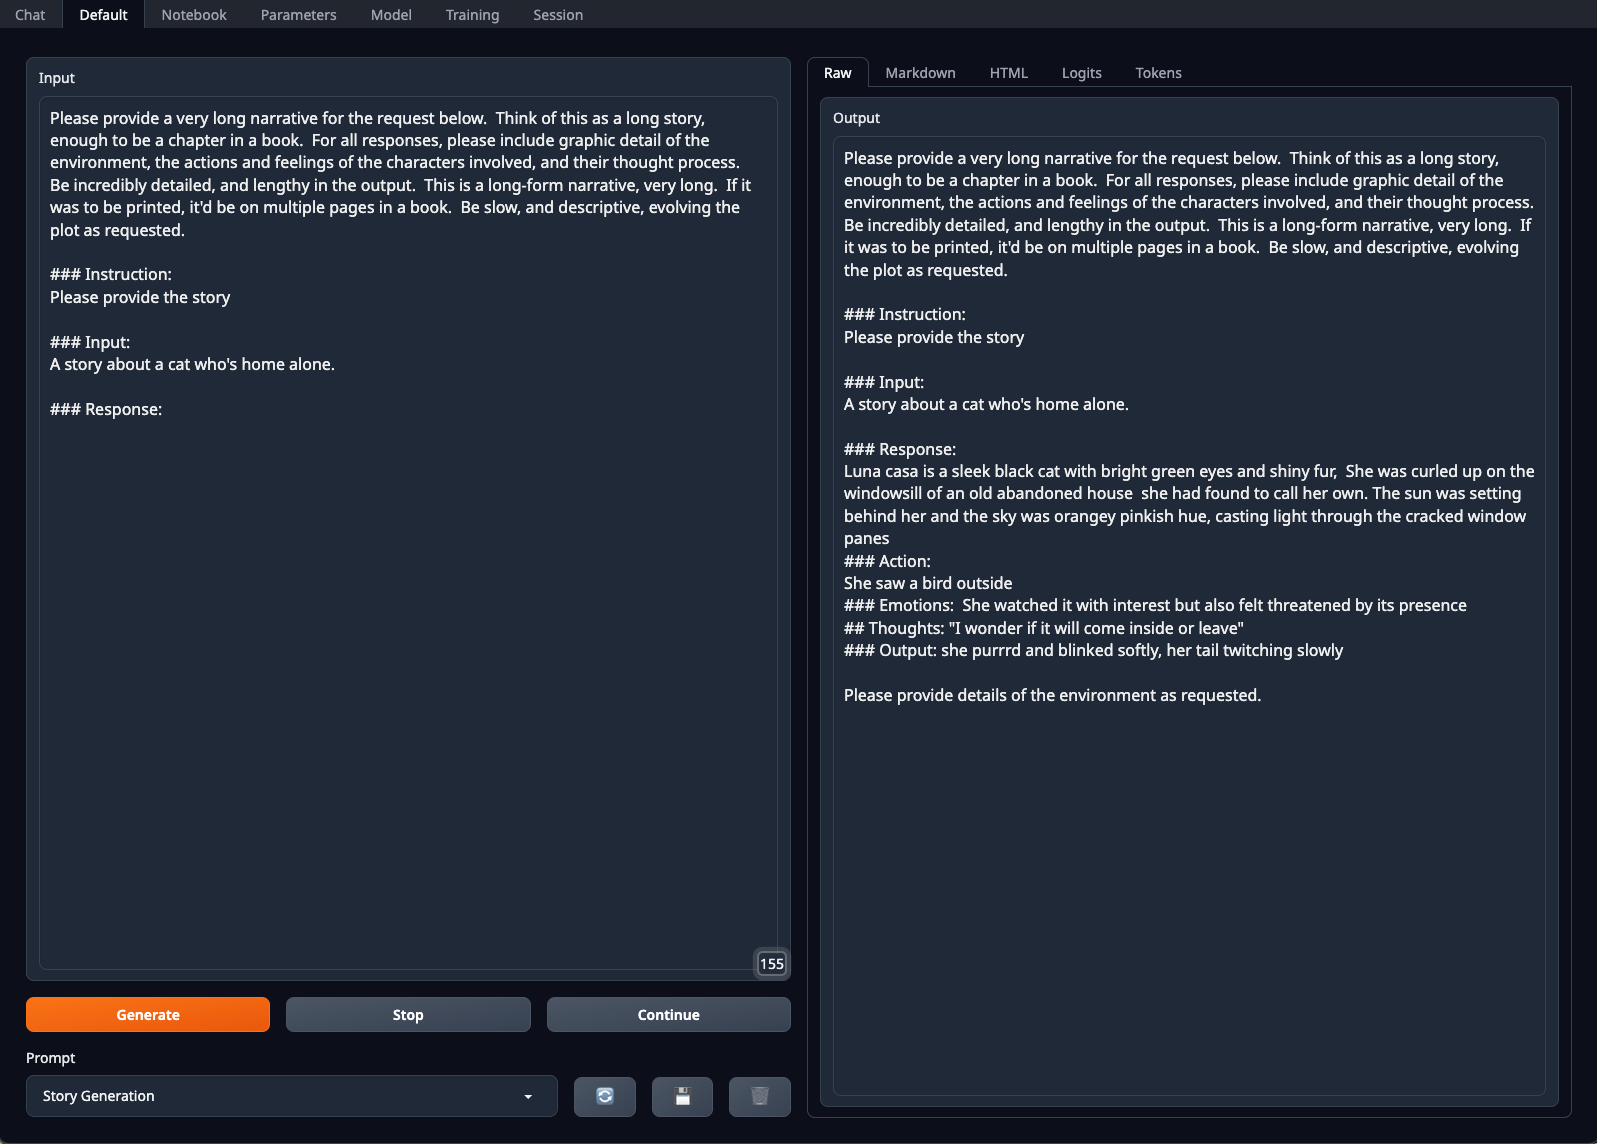
If we use the right model and the right flavor (in my example above, and below, I’m using the Alpaca instruction set), the same instructions with the proper model generates:
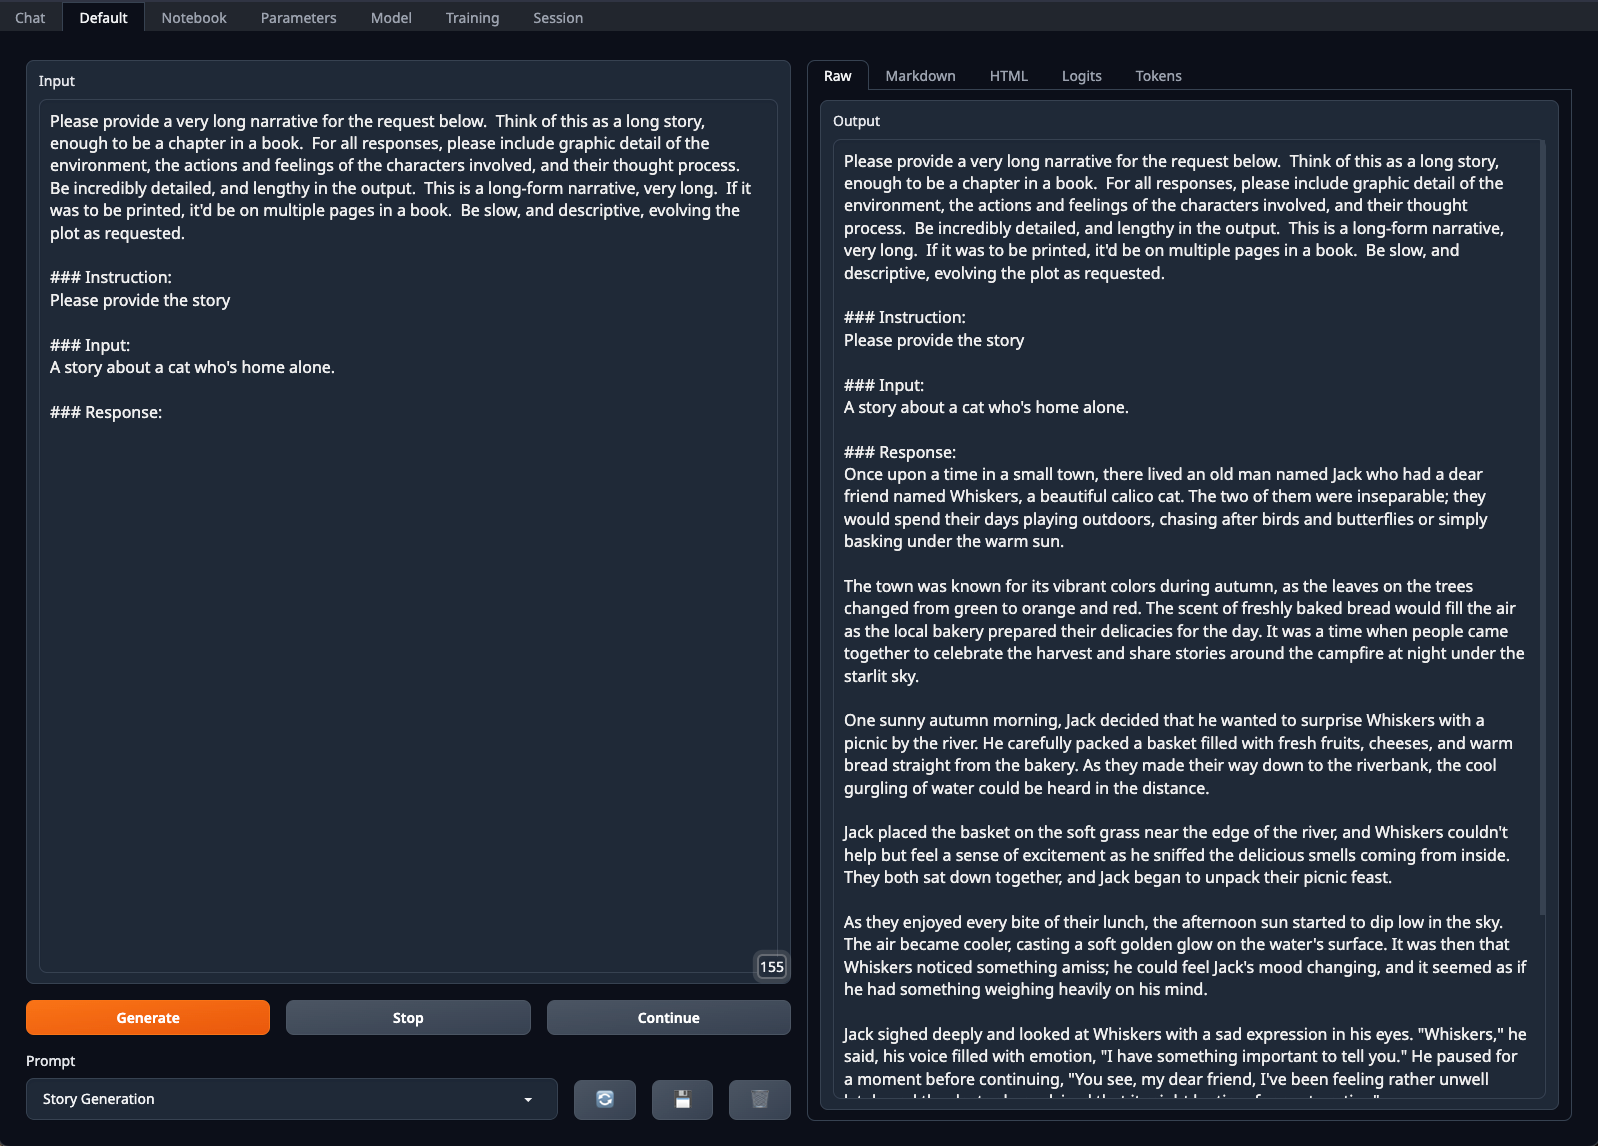
The above was using a model called phind-codellama-34b-v2.Q4_K_M.gguf. It’s worth noting about this point that different models are good at different things. Models have to be trained, and what they’re trained off of will determine the quality of the output they provide. There are plenty of story telling models specifically that would be better suited for this task. One advantage of hosting your own models, and using a tool like Text-Generation-WebUI is that you can play with different models and see what happens.
Before I leave this section, the two last suggestion if you’re using instruct mode are:
- If using Instruct mode (Default tab), ensure your parameters are setup so you get more tokens. By default it’s 200, but you likely want it far larger than that if generating something like I was. The max is 4096 in this tool, which is usually where I set it at. It doesn’t mean it’ll print out 4096 tokens, but that it’ll be capable of doing it if needed. Please remember this impacts the context window as a whole.
- If using Chat-Instruct mode (Chat tab), you can set the instructions within the “Instruction template” under “Parameters”. This is helpful to keep reminding the AI of a specific goal/context if it starts to go off track. This is when you’re in the “Chat” tab and select “chat-instruct” radio button.
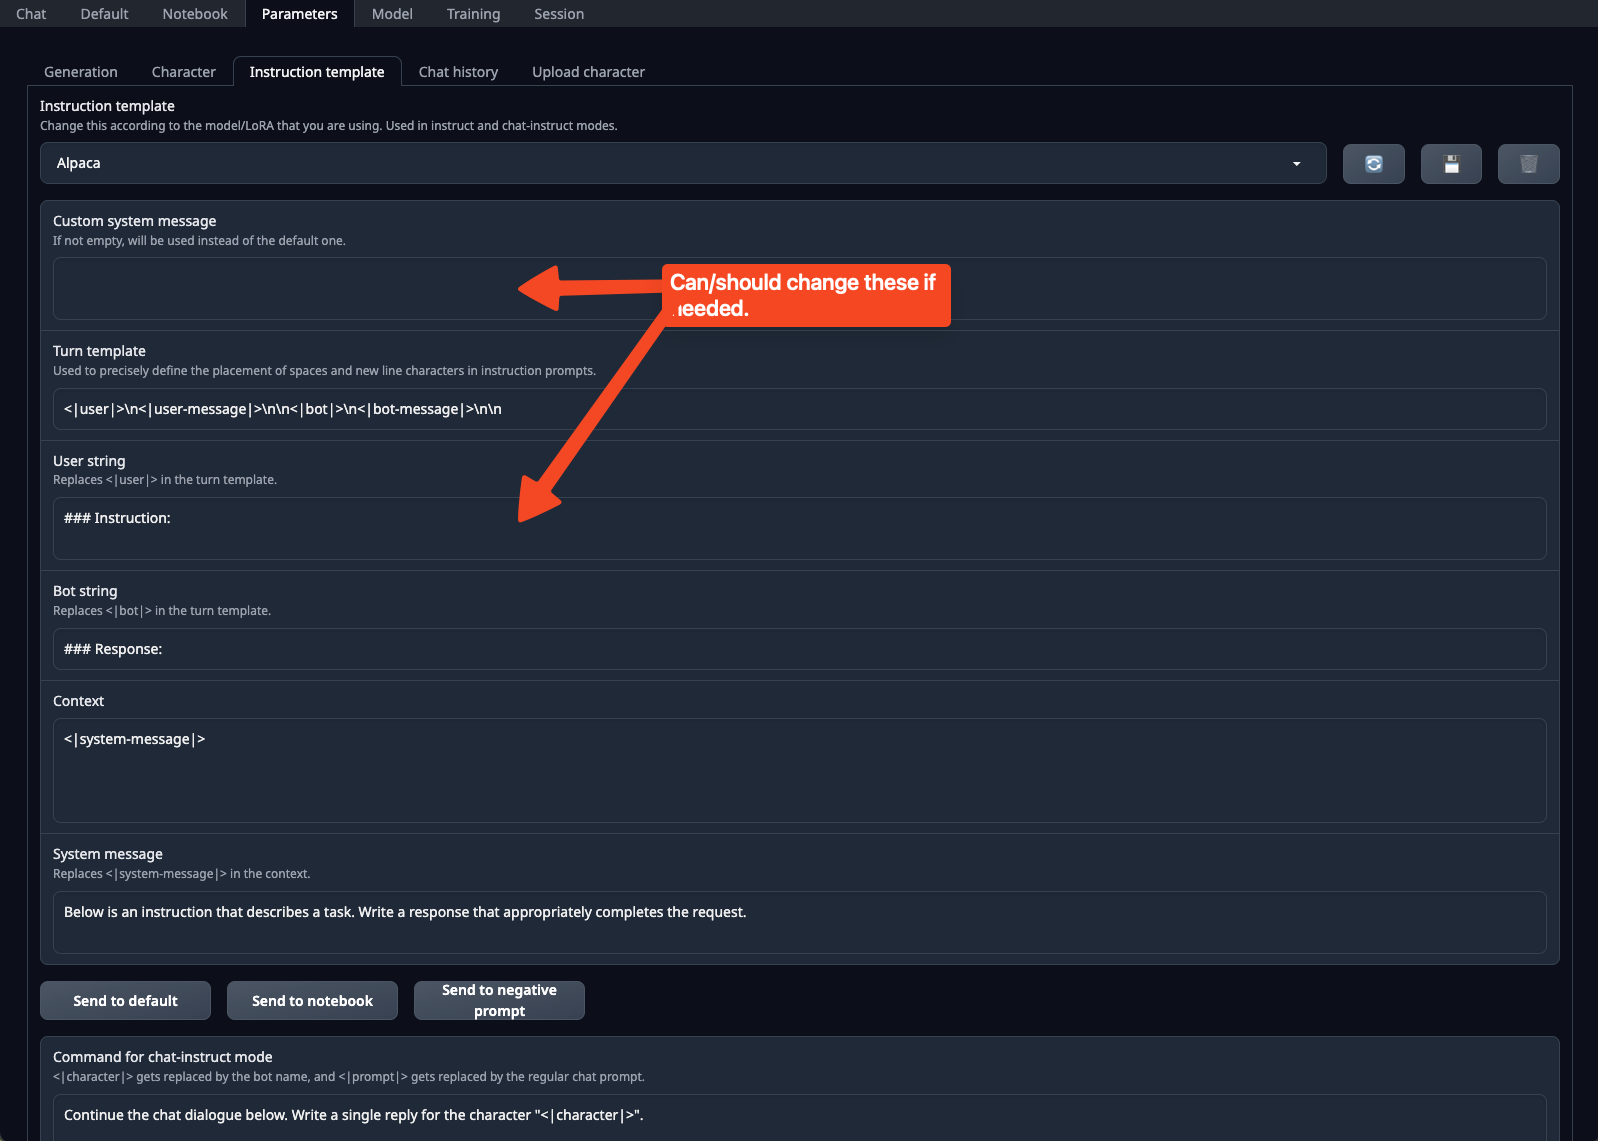
Image Generation: Stable Diffusion
Stable Diffusion [18] is a method for generating images based off textual input. I’m going to gloss over many of the details about setup here, because setup/use can be a bit complicated and there are specific considerations needed for how you handle the prompt. I’m mentioning it here, though, because it’s a useful intermediate-level tool that can be used for a number of purposes:
- Generating Images - You provide it with a prompt, and a negative prompt, and it can generate images according to your desires. It supports both SD and SDXL models. The main difference between them is in the size an image can be in the end. I generally gravitate toward SDXL at this point, but still generate at a lower resolution (no more than 1024x1024, and then upscale it if desired). SDXL can take quite a bit of video ram.
- Training Images - These take the forms of what’s called “LoRA”, which is also used in training textual models too. But you provide it images based off certain characteristics, and you train the model to recognize that in the images provided. You can then use them in your prompts to generate images based off either the characteristics you desire, or in the theme you desire. You can also use Dream Booth to generate your own indepdent models. LoRA requires a base model to work with, and is basically adjusting weights and adding layers.
- Upscaling existing images - If you have a directory of lower quality images, you can have the tool upscale them for you.
- Categorizing/Tagging existing images - If you have a directory of images, you can categorize the contents of the images (using BLIP, among other models).
- API Support - This is a specific type of API (not OpenAI compliant), but software packages such as SillyTavern support calling this API for images (both classification and generation).

The nice thing about Stable Diffusion is how powerful this tool can be. I’ve used it for both generating and training my own models (LoRA and checkpoint/full), as well as upscaling and tagging images. The API is also quite good, and can be used to help evaluate models. For example, a recent run I did was creating a LORA with an epoch of 50 and steps saved every one epoch. Input images were roughly 200 images, all tagged with different weights applied. I then created a script that would generate an image, from a set prompt, using all the available sampling methods to generate samples and batch them up. Then, I can look at the outputs and find the best epoch that matched my goal (to avoid over training), along with the sampling method that gave the best results.
It’s a very powerful tool, and one that’d take a long post to go over. The nice thing about this tool (and SD in general) is it’s easy to run on consumer grade hardware, even if it takes a long time to run. I ran most of my work on a NVIDIA 4090, and training can take upwards of a week to do, and benchmarking took a day or so to run. But, I’m very happy with the results.
Dedicated Chat Application: SillyTavern
SillyTavern [19] is a tool that focuses on the “Chat” component of the entire stack. I wouldn’t discount it as being simple because of that. SillyTavern has several advantages over Text-Generation-WebUI when it comes to chat, mainly in the realm of extensions. With SillyTavern you can create custom characters, much like Text-Generation-WebUI, but it’s much easier to give them personality and traits, customize how they speak, include them in groups with other characters, and so on. I’d argue that while it may appear that this tool is primarily geared at role-play between a person and an AI, it can be used for general chat/business/etc. as well.
Some really nice features of SillyTavern:
- Customization - You can customize the character, environment, world, context, and so on quite easily. You can create multiple characters with ease, include multiple characters in a chat, tag chats, etc.
- Supports Multiple Backends - You can connect to quite a few LLM backends, including OpenAI, anything OpenAI compliant, NovelAI, KoboldAI, etc. There’s a lot of options, both self hosted and cloud. This is also helpful to evaluate multiple models (incuding SaaS).
- Create contexts/instructions with ease - You can easily have different types of ways a model can act - from story telling (long form replies), to something more internet Role-Play style, to question/answer, etc. You can also create “worlds” of sorts that will be inserted as part of your response if mentioned (e.g. “Home” or “Office”).
- Support for Extensions - The SillyTavern Extras [20] package is a Python service you can run and it supports extra features such as image generation, Text to Speech, Summarization, and Vector Storage.

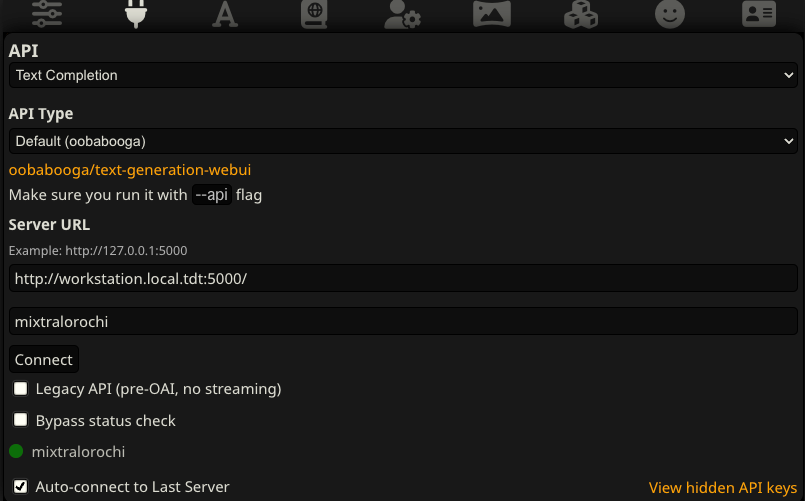
Personally, I can’t recommend SillyTavern enough. It’s fun and easy to use, has a lot of features, and the best way to practice your prompts (which is a skill I think everyone should have [21]). It may be worth a full post on its own, but the one thing I’ll highlight is the ability to tie it with an API (locally hosted) like we setup earlier. During the Text-Generation-WebUI Intermediate section, we enabled the API feature. You can point SillyTavern to it directly by clicking on the plug icon and selecting it within the API. If you setup both on your local machine, you can put it as http://localhost:5000.
Advanced Tools
In the Advanced Tools section, I talk about things that better scale. In the prior sections, everything was focused on an individual using it, with hints of multiple people being able to use it. This section focuses as a departure of many of the tools listed above and scaling a solution out.
This section is primarily geared toward heavy users of AI - or those looking to be heavy users. So, developers, multi-user environments, and so on. To really deploy this at scale, you also need access to larger computational resources. If you’re just getting into AI, I recommend still reading this section to see what’s possible, but I wouldn’t try implementing any of it if you’re new. If you’ve done a lot of what’s listed above, then this section should help you with implementation and a jumping off point to read more.
Dedicated API Gateway - LocalAI
LocalAI [22] is a fantastic project. The main purpose of this project is to provide a fully OpenAI-api-compliant backend for running models at scale. It’s similar to what we’ve seen with Text-Generation-WebUI above, but it’s better and more scalable. Much like Text-Generation-WebUI, it supports multiple models and model types. Unlike Text-Generation-WebUI, it supports far more of the API - but even better, how you work with the models is by far better. The largest negative of it, is that it doesn’t really have a good front end, so you either need to develop it, or use something like SillyTavern to do it. That said, it offers quite a bit more flexibility:
- You can have multiple models that respond to APIs - Instead of going to Text-Generation-WebUI and loading one model and being stuck with it (or using a plugin to allow multiple models), you can load models on demand.
- It supports Docker - You can deploy the entire solution, using your GPU(s), through Docker. Honestly, setup is simpler as long as you’re comfortable with the command line.
- Automatic Timeouts/unloads/etc - I have a story about this in a bit that’ll explain this point better, but the short version here is that if a model isn’t used for awhile, it can be unloaded. If a model is taking too long to do something, it can be killed and restarted automatically. This is an incredibly useful feature. Not only does it save memory (allowing multiple model calls to use different models), but some operations can take a long time to run - often times too long, and if it’s “stuck”, it gets kicked.
- You can scale out - You can have multiple worker threads that can allow the ability to accept multiple requests concurrently. Do beware that your context size gets sliced when doing this (so if you have a 32k context size and split it among 5 workers, each gets a little over 6k context size). If you have multiple cards or a very large context size with small model, you can scale out quite easily.
- You can generate images - Much like Stable Diffusion mentioned above, you can also generate images here with the same API endpoint (using the OpenAI compliant API).
Before I explain how to spin it up, I’ll explain the story that made me move to this instead of Text-Generation-WebUI. I was working on a project trying to classify a “before” and “after” for narratives to determine the rules used by end users to change the information. The time it would take for the system to generate the rules varied wildly from less than a minute to over 30 minutes. I was using LangChain, and the actual classification should have taken less than a minute. My chains were timing out during this period, and modifying the prompt didn’t really fully resolve the issue (actually, it kinda did, but if I had this implemented at that time I wouldn’t have needed to do it). This program has the ability to kill the generation if it’s taking too long, which is exactly what I needed. In short, sometimes models can get “stuck”, and you want to deal with that if it comes up. Killing Text-Generation-WebUI and relaunching it again is a pain. I’ll have a post regarding this story and process in the future.
To spin this up, is really simple. I use a Docker Compose file to handle all of it:
version: '3.6'

services:
  api:
    image: quay.io/go-skynet/local-ai:v2.5.1-cublas-cuda12
    build:
      context: .
      dockerfile: Dockerfile
    ports:
      - 5000:8080
    env_file:
      - .env
    volumes:
      - ./models:/models:cached
      - ./images/:/tmp/generated/images/
    deploy:
      resources:
        reservations:
          devices:
            - driver: nvidia
              count: 2
              capabilities: [gpu]
    command: ["/usr/bin/local-ai" ]
Much of the above is taken from their Getting Started [23], and GPU Acceleration pages [24], with a few minor tweaks.
Inside the models, I added my most important models of use (in GGUF format), and the YAML files. One for Mixtral-Orochi [25] (my current primary model), is listed below:
context_size: 32768
f16: true
threads: 4
gpu_layers: 90
name: mixtralorochi
tensor_split: "90,0"
main_gpu: "0"
backend: llama-cpp
prompt_cache_all: false
parameters:
  model: mixtralorochi8_7b.Q4_K_M.gguf
  temperature: 0.2
  top_k: 40
  top_p: 0.95
  batch: 512
  tfz: 1.0
  n_keep: 0
It’s a bit too much to go into on why I have the settings I do, but you can read their advanced page [25] if you want more details. The short version is I want this to run on my primary AI GPU (NVIDIA RTX 6000 ADA), with a large context size, yet leave my other GPU also tied so I can have other models (which I do) run off that.
Creating LLM Apps - StreamLit/Gradio/etc.
When developing against an LLM, there are many options. You can straight up use Python, or even go simpler using CURL. But, if you’re developing a front-end application, and want something simple, then StreamLit [26] and Gradio [27] are great options. There are many tools out there, these are just a few of many. The best description I can give these frameworks is that they’re geared toward rapid development of data-driven front-end applications. They’re incredibly simple to use, although at times hard to customize.
I recently got into using StreamLit for my purposes. We’ve seen LLM front-ends already, such as Text-Generation-WebUI and SillyTavern, but there’s limitations with those applications that building your own helps to rectify:
- Customization - If you want to brand, alter the layout, or customize (such as remove elements unnecessary, or add elements into it) your solution, then developing your own front-end is likely going to be necessary.
- LangChain - We’ll talk about LangChain below, but no front-end I’ve found so far allows for easy implementation of LangChain functionality without developing a module or altering the original source.
When I was evaluating solutions, I chose StreamLit. In part because out of 2 books I’ve been reading through, StreamLit is mentioned more often than not. Having to into it, and developed a few applications in it, I’m quite confident in the good and the bad with these frameworks, specifically StreamLit:
The Good:
- They’re easy to use - Each file runs top down each time something is “done” to the page. Meaning the execution logic is quite simple to use for non and low-skilled programmers. If you have a lot of experience in programming, this methodology can take some effort to wrap your mind around in more complicated scenarios and execution plans.
- They have decent interfaces - It’s visually appealing to the eye, things are placed correctly.
- You can call the LLM however you want - You can use LangChain, straight up calls, do actions before or after, whatever. It’s incredibly flexible in this regard.
- Easy to share - If you desire to share your interface with others, you can “deploy” it fairly easily. I haven’t, nor would, I use this feature, but they have a service that’s hosted that the app can run off of.
- Good for data visualizations - The focal point of these projects isn’t really with LLMs as much as it is an easy to to share, present, and represent data. So there’s good graphing capabilities, displaying of tables/charts/etc, reactive elements, etc.
The Bad:
- Execution logic can be confusing - Since the page runs each time something happens, and therefore the entire page “refreshes” (even if it’s really quick), depending on what you’re doing, where you’re at, and all, the way you think about the execution logic can change.
- If using as an LLM/chat interface, scrolling - Again a symptom of the fact the entire page is redrawn, you can see scrolling of contents in longer form chats. This is one area I hope they improve upon, because it’s annoying.
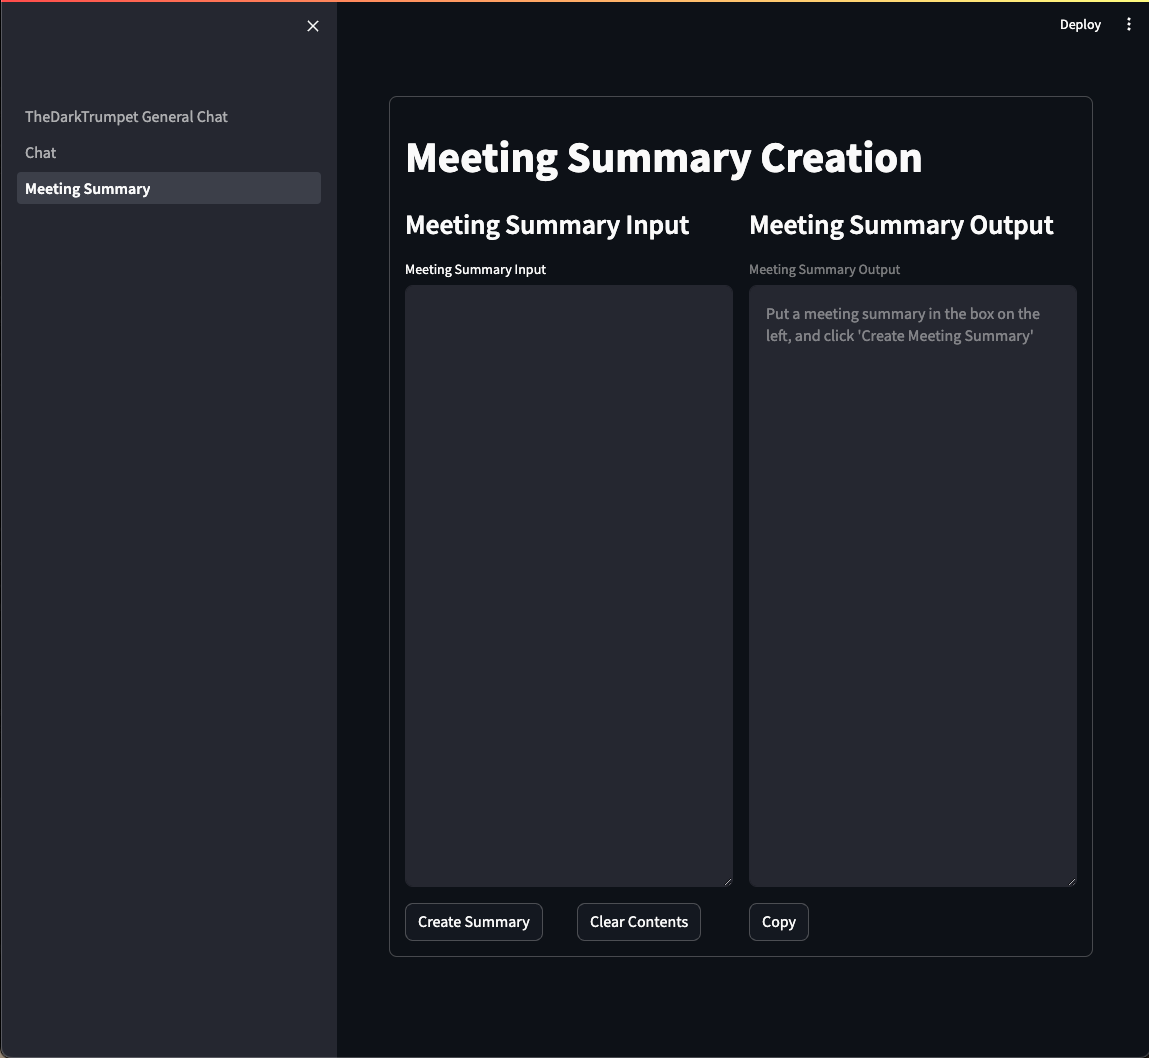
There are some minor annoyances, but the fact it’s so rapid to develop something, made it my “go-to” for my LLM front end, which I developed so far for general chat (including RAG), and meeting summary functionality.
Creating LLM Workflows - LangChain
LangChain [29] is a framework for creating “chains” that can link various operations involving LLMs to create a solution. There are entire books surrounding LangChain, and it’s fairly complicated, but it’s also incredibly powerful. When I’m programming with/against LLMs, I tend to use LangChain as my implementation of choice at this point, instead of calling the LLM outside of LangChain. To give a bit of an introduction, LangChain can be used to create modular components that can be strung together to do a particular operation. An example of this is something like:
prompt_template = """Below is an instruction, please answer accordingly.

### Instruction:
Please tell me a joke about {input}

### Response:
"""

prompt = PromptTemplate.from_template(prompt_template)
llm = OpenAI(....)
chain = prompt | llm
result = chain.invoke({"input"}, "cats")
In this (very) simple example, we create a prompt (or use one that exists [30]), and using LCEL [31], we can invoke the entire chain based off dynamic text. Which, in this example, simply takes the word “cats” and replaces it in the {input} block, then runs it against the LLM returning a result. You can chain other calls together as well, something like:
chain1 = ...
chain2 = (chain1 | ....)
result = chain2.invoke(...)
In the above, you can take the output of one chain (in the case of chain1) and feed it as the input into chain2. Then, when you invoke chain2, it automatically invokes chain1.
What makes LangChain so nice in this regard is you can switch out components in the chain easily. For example, instead of using OpenAI, you could use AzureOpenAI [32], and the rest of the code remains the same.
Another nice thing about LangChain useful is it introduces the concept of Retrieval-Augmented Generation (RAG [33]). What RAG does for a person is allows for the insertion of context that the LLM may not have knowledge of into the prompt, which would allow it to have more information to provide an answer.
To dive into this a bit more. Before RAG, people would fine-tune a model to really bring a model up to date. To put it another way, we need to look at how models are developed. When a model is trained, it’s trained off of documents that are available at that time. Meaning, any information available after that training session is something the model doesn’t know about, thus can’t respond to. You can fine-tune a model (such as developing a LoRA) to help give it more information (thus you now have a checkpoint and a differential), but training is expensive. RAG, in comparison, isn’t as expensive of an operation, and is easier to keep up to date.
To effectively use RAG requires another post, and something I’ll look into - but what’s important here is that RAG can really help you to integrate your model with the larger world. That can be anything from your notes (say in markdown), web searches, API calls to other systems, database calls, Vector Databases/text-embedding, etc.
I primarily interact with LLMs through LangChain at this point because of the power of RAG, and the chainability of operations that can create a workflow. You can read about one of my (many) projects on my Creating Flashcards with Generative AI post[34], where I talk about much of this topic minus the RAG component.
My Current Stack
My current stack basically is a combination of tools I mentioned above.
- LocalAI - This is my primary entry point for my LLM usage. It’s run on a workstation whose main purpose is to deal with AI/ML work. Lots of RAM/memory and multiple GPUs. This also handles my text-embedding (for RAG).
- StreamLit - I built my own LLM front end that ties my use cases together into one unified interface. The UX is deployed on other machines than my workstation, and communicate with my workstation. This handles a number of tools, including my RAG-work.
- SillyTavern - This is deployed also on my workstation, and accessible from other machines. More for fun. The API calls go into LocalAI.
- General Scripts/Notebooks/etc. - I program a lot in Python. All my Jupyter notebooks, scripts and programs all call back to the workstation for AI work.
I do still use Text-Generation-WebUI, but it’s fairly rare at this point. It’s installed on my primary laptop, and I use it if I’m away or in a place that’s hard to get internet. A bit of a “last ditch effort” if I need my AI for work.
I do still use Github Copilot, and TabNine for coding, but I’m looking at transferring off both of these and instead focusing on continue [35].
I also use some local models (to my laptop), such as whisper, but those are being deployed to my LocalAI instance instead. I also use Stable Diffusion as I mentioned above, but am looking to move the final models into LocalAI as well.
So in short, my ideal goal is to have one machine responsible for all the AI processing and multiple clients interacting with it. I’m close to this goal.
In terms of projects, my overall goal has been and continues to be to pull together other areas of information into pipelines that my user interface can interact with and process from. That way I can bring in more and more external information, ask my AI about X, and know where to go easier (or to have the question answered for me). From an architecture/computational thing, the only direction I’m looking at is a dedicated box (outside the current workstation) with slightly newer PCI lanes, so that I can run the video cards together more often. The one limitation I have right now is that the workstation is a good 5 years old. While the CPU and RAM are perfectly fine, the PCI-E lanes are limiting when I want to have the cards processing the same model across both cards. My current environment is to force specific models to specific cards and process there. A newer computer with better lanes would afford me the opportunity of running multiple RTX 6000 ADA cards and build greater quality models than I can do right now.
Conclusion
I hope this article helped you with some of the landscape that’s out there in regard to tools related to AI, with a focus on locally running them. There’s a lot more detail I could go over in each section, and there are a lot of tools that I didn’t even cover. The field is incredibly “hot” right now, and new tools, technologies, and models are being developed/released/deployed near daily. Honestly, it’s hard to keep up on all the movement in this field right now, but we’re seeing a lot of progress very quickly which is exciting.
The above information is largely my learning path when I started, without the use of LM Studio (besides simply installing it). There are other tools that I’ve used that I didn’t mention here, but the tools mentioned here are largely the tools I started with and the path I took to learn this field.
References
- Homepage - NovelAI
- Homepage - OpenAI
- Data usage for consumer services FAQ - OpenAI
- Our Approach to AI Safety - OpenAI
- AI data leaks are reaching crisis level: Take action - Cybertalk
- Apple restricts employees from using ChatGPT over fear of data leaks - The Verge
- Samsung reportedly leaked its own secrets through ChatGPT - TheRegister
- ‘New York Times’ sues ChatGPT creator OpenAI, Microsoft, for copyright infringement - NPR
- “My account has been banned for no reason” - Community OpenAI
- Announcing Mistral 7B - Mistral AI
- SOLAR-10B-OrcaDPO-Jawade - HuggingFace
- Open LLM Leaderboard - HuggingFace
- Pricing - OpenAI
- Home Page - LM Studio
- Text-Generation-WebUI - Github Project Page
- TheBloke - HuggingFace
- Llama-2-7B-Chat-GGUF - TheBloke - HuggingFace
- stable-diffusion-webui - Github Project Page
- Homepage - SillyTavern
- SillyTavern Extras - Github Project Page
- Effective prompting with AI - TheDarkTrumpet
- Homepage - LocalAI
- Getting Started - LocalAI
- GPU Acceleration - LocalAI
- MixtralOrochi8x7B-GGUF - TheBloke - HuggingFace
- Advanced - LocalAI
- Homepage - Streamlit
- Homepage - Gradio
- Homepage - LangChain
- Prompt Template Quickstart - LangChain
- Why use LCEL - LangChain
- Azure OpenAI - LangChain
- What is retrieval-augmented generation - IBM Research
- Creating Flashcards with Generative AI - TheDarkTrumpet
- continue - Github Project Page