Introduction
Recently, at work, we ran into a data issue with MySQL - and the recovery process didn’t work as optimally as we would have liked.
My default, MySQL does not keep logs that enable incremental restores [1].
This needs to be manually enabled, but if you don’t, then you’re limited to restoring full-database backups. This can lead to a loss of data that was modified during the day.
This post discusses my experience playing with this feature, and my feelings about it.
You can find all the source code discussed here at: https://github.com/TheDarkTrumpet/demo_mysql_binary_logs
Explaining MySQL Binary Logs
The main documentation for all this can be found at: https://dev.mysql.com/doc/refman/5.7/en/point-in-time-recovery.html and it’s not enabled by default.
To enable this feature, you either have to pass --binary-mode when loading the binary itself, or, edit the configuration file and include it like I did. In my configuration file, I have the following portions used:
binlog_format = ROW
log_bin = /data/logs/mysql-bin.log
datadir = /data/db
There are two main things to note here:
- I chose the
ROWbased format. There are other options too, butROWappeared to give better compatibility with other tools I was also investigating. - I chose to put the data and the log files on separate directories. This is generally much better practice than sticking them on the same drive.
Once these are setup, and the service restarted (or setup, in the case of the lab below), then the log files still start to show up. There are a few commands of interest here. Please note that the lab and test case will help explain these commands a bit better:
mysqlbinlog- The main utility to look at the binary files- It accepts a
--start-positionor an--end-positionthat can be used to filter a specific file. - It accepts a
-doption to specify a database.
- It accepts a
SHOW MASTER STATUS- SQL command that shows the current log file and position.
Setting up a lab.
I didn’t have a MySQL setup already for testing this on, and being on an M2 Mac, I found MariaDB [2] to be the best solution for me to use here. I started with MariaDB version 10.7.8, because it included the mysql binary as well as mysqlbinlog, which were both needed.
The startfresh.sh script in the base repo sets everything up, which includes running the image with volumes, running the image for actual use, and loading the database itself.
Explaining the test case
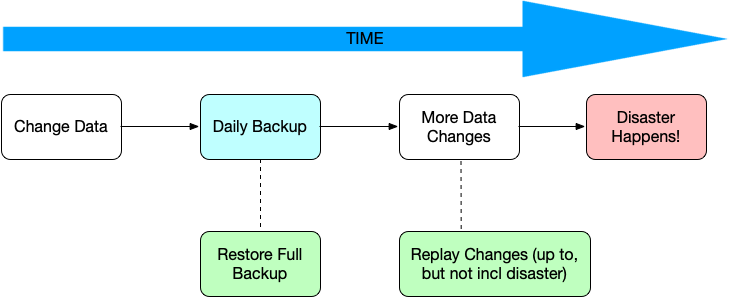
In the above scenario, we’ll start with the restored database (right after running startfresh.sh). This scenario includes the following:
- Change Data: Running insert statements to add a few records.
- Daily Backup: Create a backup using
mysqldump, and restart service. - More Data Changes: Running a few delete statements.
- Disaster Happens: Drop database
- Restore and Repair
- Full Backup
- Differential
Running the test case
All the test data for all this is stored in a database called classicmodels. This is a database I found on a tutorial website [3], and included it in this repository for script-ability.
I strongly recommend running the startfresh.sh script prior to going through the test case.
Parts 1 and 2
Steps
To perform these steps:
- Run some insert statements (see
scripts/insert_productlines.sql) - Create a backup
Run:
mysqldump classicmodels > /scripts/full_backup.sql
- Check the current bin and location. To do that you the SQL command
SHOW MASTER STATUS, or run the script inscripts/get_bin_logs_info.sh
This should show something along:
SHOW MASTER STATUS
File	Position	Binlog_Do_DB	Binlog_Ignore_DB
mysql-bin.000004	345292
What the above tells you is that you’re currently writing to bin 4, that that current location. Which helps when you want to restore.
After that, restart the docker stack (docker-compose down && docker-compose up -d)
Reasoning
This step emulates general daily usage, with the evening daily full-database backup. The full backup will be the main part of our restore, and the full backups should happen at fairly regular intervals. Do note that there’s significant blocking with a mysqldump, and most places do a full backup every evening.
The SHOW MASTER STATUS is due to the need of getting the general location/time when we did the backup. This is important for when we get the differential. A keen eye will note that we have a bit of a race condition here. If this was a table delete, and we could potentially have activity happening on this database, we could get a location that’s actually incorrect. This can be mitigated by passing --master-data=2 to mysqldump which will embed the log/path at the top. I go over this more in the Operationalizing portion of the document.
The restart of the stack is not necessary, strictly speaking. I prefer it, because every time the service restarts, the bin position increments, regardless of the size of the bin. This, for me, is just visually easier to track things down.
Parts 3 and 4
Steps
To perform these steps:
-
Run a few delete statements (see
scripts/delete_productlines.sql) -
Drop Database (run:
drop database classicmodels)
Before leaving this step, rerun the SHOW MASTER STATUS sql command. You should notice that your bin number is 1 greater than the last time. Each time that the container is restarted, or the service itself is restarted, the number increases. My personal feeling is I like this feature, so that I can better track which log files I need to deal with.
Reasoning
These two steps are intended to emulate usage after our daily backup. Often times, restoring from a full backup alone is a very bad idea. So, these delete statements we want to replay over the restored full backup.
Part 5
Steps
In Part 5, I’m counting this as the “naive” way of handling this. Specifically, in the sense that I’m not worrying about actions that happen after the full backup, but before we the service restart. The first part here is that we need to look for the drop statement, and the differential out.
There are a few ways of doing it, but in this use case, one likely knows exactly when the database went down and was likely a big mistake. I’m going to assume that one’s at the 000003, log file at this point, which is where I’m at. If using the docker image for MariaDb like I am, it’s best to install less at this point.
apt-get update
apt-get install less
Next, we need to search through the log file itself:
mysqlbinlog /data/logs/mysql-bin.000003 | less
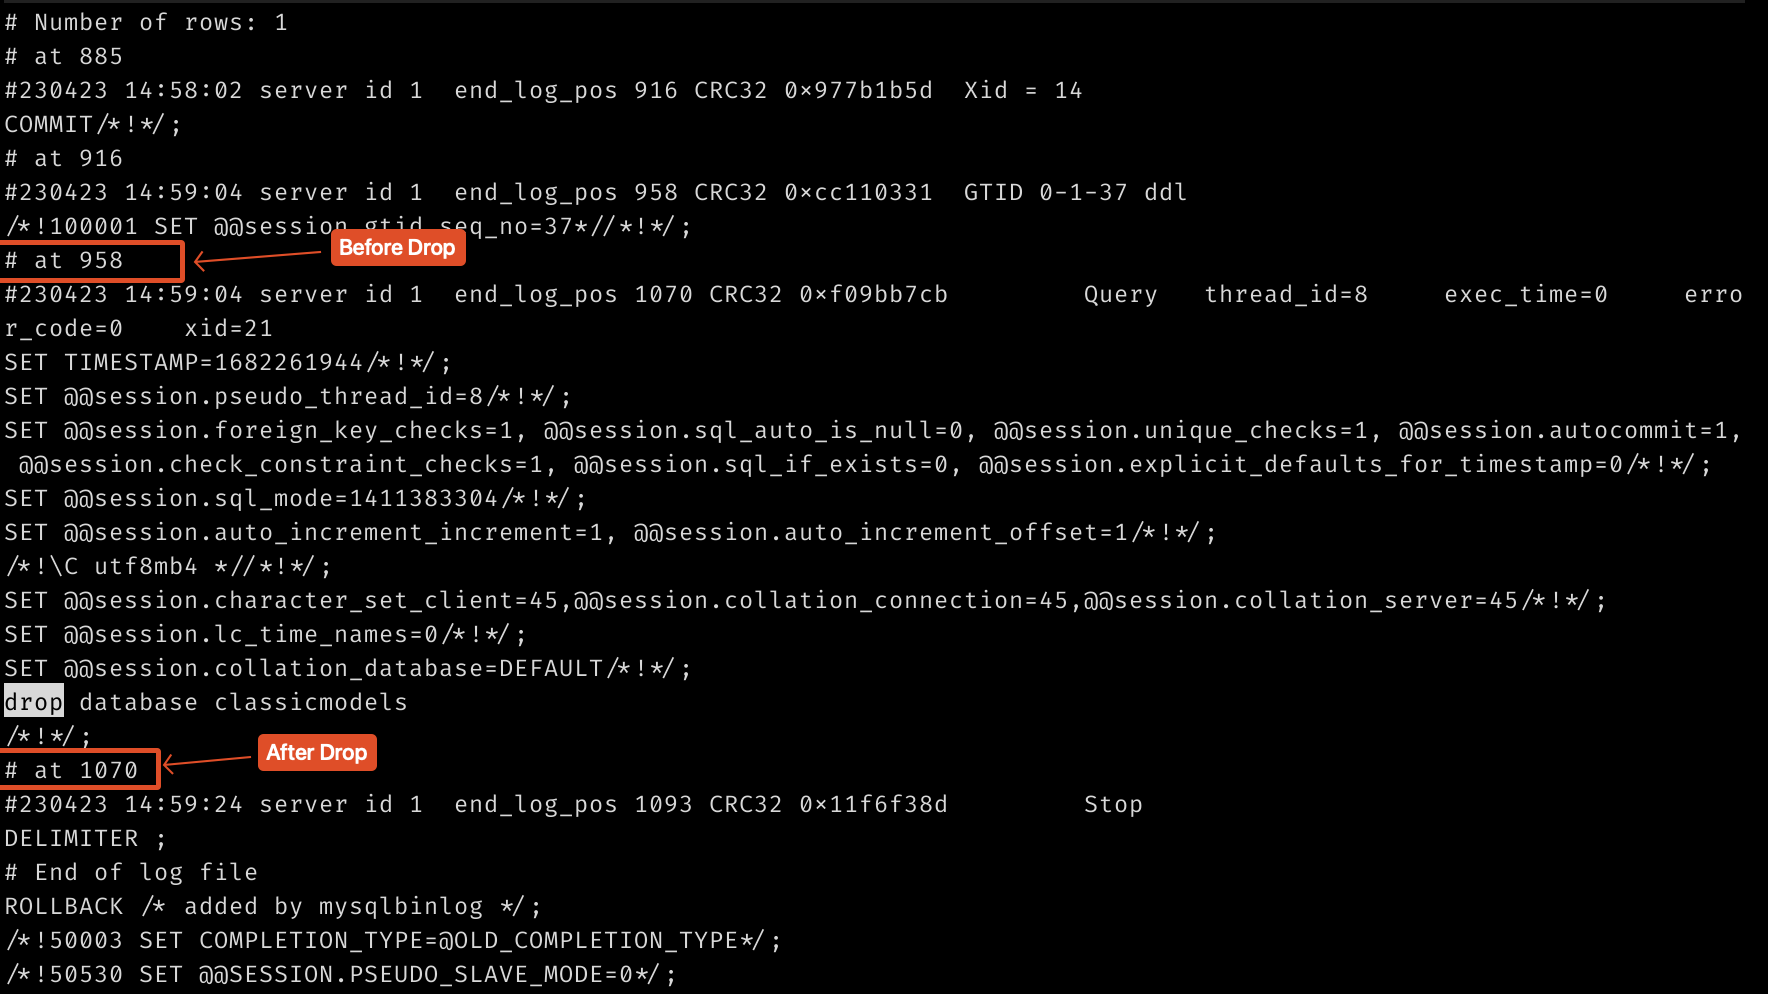
You should get an image like the one below.
In the above image, our drop database happened between the position IDs 958, and 1070. To get our differential, run:
mysqlbinlog -d classicmodels --stop-position=1070 /data/logs/mysql-bin.000003 > scripts/differential.sql
This will create a differential up to our drop database command. There’s nothing we need to replay after that fact, but it’s worth mentioning that in this case our restore is pretty simple. If this was a table deletion, we would need to also look after this spot too.
Now, all that’s left is to restore the full backup and the differential. Since we deleted the database, we need to recreate it, and apply our changes. The commands for all are:
mysql -e "create database classicmodels"
mysql classicmodels < /scripts/full_backup.sql
mysql classicmodels < /scripts/differential.sql
Reasoning
This particular scenario is very “simple”. Because the database was deleted, we know no operations could happen to that database after the drop. So we have two parts. While thinking about how to go about recovering data, it’s important to also think about other scenarios that you may want to cover for. This also includes drive or machine failures, too.
Operationalizing
The above steps are a bit - intensive and a problem from a data integrity standpoint. The largest problem we have is the potential for race conditions. To solve that, and at least automate part of the process, a script was created in scripts/do_backup.sh. This script does a few major things:
- It only backs up user-level databases (so no core databases)
- It embeds the bin/position at the top, AND, includes it in the file names themselves.
The reason why this is important is because getting the bin/id applies to the entire database server, not just the database we’re looking at. In other words, if we grabbed the bin/id at the beginning of a backup routine for each database, individually, we’d have some potential windows (mainly before the backup happens, but after the ID/pos was determined) where events could happen. This script allows us to backup databases individually while keeping the pos/id specific to that database.
Results and thoughts
Overall, this was an interesting experience - and a lot more work than I thought at first. I think for simple types of systems, without very heavy load, I can see this working. For a database that sees a lot of activity, or where time is of the essence, then this seems a bit much. Long term, I’m hoping to find some better scripts that can automate parts of this. I also find it really surprising that MySQL has none of this default. I’ve used Microsoft SQL Server for years, and the notion that transaction logs are just not there is bizarre at least.
That said, I didn’t know anything about MariaDB before this, or its relationship with MySQL. There’s a lot about interacting with MySQL/MariaDB that I wasn’t well versed on, so this exercise helped in that regard.
For further reading, I suggest the Scripting MySQL [4] post about this topic. They have a few extra ways of doing what I’m doing here. If your company has the money and/or resources, then the Enterprise version of MySQL is likely better from both a speed and ease of use standpoint.


