Introduction
Qubes-OS has an amazing feature called “Split-SSH” [1] and “Split-GPG” [2]. The short version of how this works is that we have a virtual machine that acts as a gatekeeper of sorts for secrets. Using the above, we could store ssh keys securely and use it for authentication, or gpg keys securely and use them for encryption/decryption/signing/etc.
What helps make this secure is a separation between your main workspace, and the SSH or GPG secret. You receive a prompt within dom0 to allow access, and can protect it via a further secret/pin/etc. Since dom0 is assumed to be secure in any Qubes install, any security issue in a specific qube should be isolated from the qube holding the secrets. Furthermore, the qube holding the secrets is “offline” all the time, and holds minimal running software just for this purpose and isn’t used for anything other than dealing with the secrets.
The guides linked in the first two references are the official guides for setting up both. Where the guides are limited in is if we want to introduce the YubiKey into the mix. This guide is an extension on the “Split-GPG” portion of the guide, but before moving on, complete both “Split-SSH” and “Split-GPG” (See ‘Options’ below on “Split-GPG” first if needed to minimize) before moving on.
This guide also assumes that you have a working Yubikey setup. This includes a GPG key and all saved to the YubiKey. It also assumes that this has all been tested out prior to this guide.
‘Options’ on “Split-GPG”
I mentioned above that you should do the full guide, start to finish. But, if your goal is to minimize the setup, you can skip a fair amount. You can skip the entire ssh-askpass portions, and anything from Securing Your Private Key on down.
Architecture
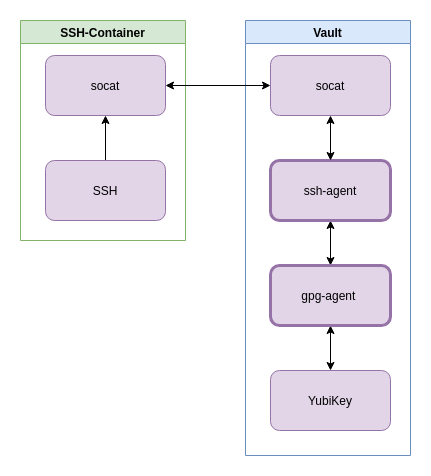
The difference here is the introduction of the gpg-agent and YubiKey portions of the diagram, but this post will focus on the ssh-agent and the gpg-agent since those are the areas we need to work through here.
I want to reiterate that the work in the first two references need to be done before this.
Verification of YubiKey before continuing
Before continuing, verify some of the setup to ensure that things are ready. First, in your vault, verify that the YubiKey is recognized by running:
ssh-add -L
And get something like the following (anonymized appropriately):
user@vault:/rw/gpg$ ssh-add -L
ssh-rsa ...
...== cardno:0001234512
user@vault:/rw/gpg
If you don’t, then the connection between ssh and your gpg agent isn’t running properly. Assuming the steps were done in the guide, and it’s an environment issue, you can add the following to your ~/.bashrc file, reboot, and retest.
export GPG_TTY="$(tty)"
export SSH_AUTH_SOCK=$(gpgconf --list-dirs agent-ssh-socket)
gpgconf --launch gpg-agent

if [ -f "${HOME}/.gpg-agent-info" ]; then
    . "${HOME}/.gpg-agent-info"
    export GPG_AGENT_INFO
    export SSH_AUTH_SOCK
fi
Testing SSH Authentication
Before continuing, one more test may help. Assuming the last test now shows properly, you need to verify that your vault can ssh to a qube. Temporarily connect your vault to the internet, and try to ssh into a host that you previously added your YubiKey (through ssh-add -L) to. This should prompt like normal.
If it doesn’t work, then configure your vault to work with ssh using DrDuh’s YubiKey Guide [3]
Once your Vault can ssh to a node, presenting with a Pin and the like, you’re good to move onto extending “Split-SSH” to cover this use case. Turn off network access to/from this cube
Modifying/Setup of “Split-SSH”
- Follow the “Split-SSH” Guide [1], and ensure you include the code specifically in this section. It won’t work out of the box, but still include it.
#!/bin/sh
# Qubes App Split SSH Script

# safeguard - Qubes notification bubble for each ssh request
notify-send "[$(qubesdb-read /name)] SSH agent access from: $QREXEC_REMOTE_DOMAIN"

# SSH connection
socat - "UNIX-CONNECT:$SSH_AUTH_SOCK"
- Create a folder under
/rw/gpg - Copy qubes.SshAgent (the one we created above) into this folder.
- Run
gpgconf --list-dirs agent-ssh-socket, and copy the path. For me, and likely for you, it should be:/run/user/1000/gnupg/S.gpg-agent.ssh - Edit the qubes.SshAgent file to hard-code the
$SSH_AUTH_SOCKvariable. It should be something like:
#!/bin/sh

notify-send "[`qubesdb-read /name`] SSH agent access from: $QREXEC_REMOTE_DOMAIN"

socat - "UNIX-CONNECT:/run/user/1000/gnupg/S.gpg-agent.ssh"
- Create a new script in this folder, I called mine
fixGpg.sh, and add in the following code
#!/bin/sh

sudo killall ssh-agent
sudo cp /rw/gpg/qubes.SshAgent /etc/qubes-rpc/
nohup /usr/bin/ssh-agent &
- Chmod the script (755), the file.
Procedure Going Forward
With the above steps, we need to execute the script after the YubiKey has been added to the vault. After the YubiKey has been added, execute the script.
But, there’s a bit more we can do to make this a bit nicer. This will seem a bit strange, as one would expect you can modify the template and hard-code the path, but I found the appVM would reboot continuously if that was done. To work around that issue:
- cd into
/rw/gpg - Create a new file,
setupYubi.desktopwith the following contents
[Desktop Entry]
Name=Setup Yubi
StartupWMClass=setupYubi
Comment=Setup attached YubiKey to handle SSH Authentication
Exec=/rw/gpg/fixGpg.sh
Version=1.0
Type=Application
Categories=Security
Terminal=false
StartupNotify=true
- Now
cdinto~/.config/autostartandln -s /rw/gpg/setupYubi.desktop . - Now
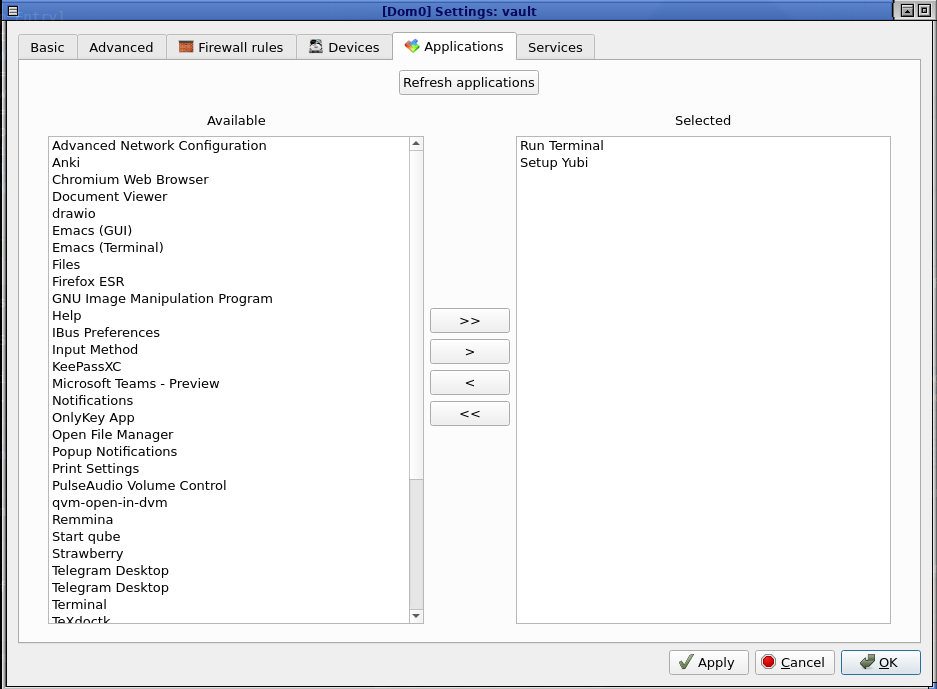
cdinto~/.local/share/applicationsandln -s /rw/gpg/setupYubi.desktop . - Now, under the vault Qube Settings program (available through Qube Manager or through the “start menu”), click on “Refresh Applications” and select “Setup Yubi” as an available application.
What this does is two fold. First, when we launch the Vault VM (which you can set as automated), it will setup the gpg path as we deal with earlier in this article. This means that the only thing we need to really do at all from here on out is connect the Yubikey, and attach it to the vault VM. If, for whatever reason, this fails then there’s a menu option you can use to relaunch manually as well.
Closing Thoughts
There’s a few things we skipped here that are worth highlighting. Primarily, if you have two YubiKeys, and swap them around a fair amount, then you need to “relearn” the connected key. The script is pretty simple for that, and I’m providing it below. But you can have this as a part of the fixGpg.sh script, another script that fixGpg.sh calls, or whatever.
Another way to solve the above too, is by using a systemctl-based approach, listening to and responding to, the disconnect/connect events. That’s outside the scope of this post, but the script for fixing the attached YubiKey is:
#!/bin/sh

gpg-connect-agent "scd serialno" "learn --force" /bye
gpg-connect-agent updatestartuptty /bye
References
- 1: Qubes Split SSH
- 2: Split GPG
- 3: DrDuh YubiKey - SSH